

If you’re wondering how to ensure your chain link fence stays sturdy and straight, the key is proper post installation.
Getting the depth, alignment, and setting right makes all the difference in preventing sagging or leaning over time.
By the end of this guide, you’ll learn the step-by-step process to securely install fence posts that stand the test of weather and time.
Let’s dive into how to do it right from the start.
Why Proper Post Installation Matters for Your Fence
Proper post installation is crucial because it directly affects your fence’s stability and longevity. The posts form the backbone that keeps the fence upright and functional. Weak or improperly installed posts can lead to sagging, leaning, and eventual failure of the entire structure. By digging deep and setting footings correctly, you distribute stress into the ground, helping the fence withstand wind load and lateral pressure over time. It’s essential to prepare the soil thoroughly since poor soil prep can compromise how well your posts hold. In freezing climates, setting posts at least 6 inches below the frost line prevents frost heave from pushing them upward. For chain link fences, following spacing guidelines for posts ensures even support and reduces strain on the rails and fabric. Skipping proper installation increases the risk of costly rework and early replacement, so investing time and effort now results in a fence that remains straight and durable for years. Choosing a coop with run can similarly benefit from attention to foundational stability for long-term use. If your yard is home to pets, using diatomaceous earth around the post holes can help control insects without chemical risks.
The Exact Tools and Materials for Fence Post Installation
To install fence posts correctly, you need the right tools and materials from the start. Gather a tape measure, string line, stakes, and marking paint to ensure accurate layout. For digging post holes, use either a post hole digger or a power auger, along with a shovel and tamper to prepare the base. A wheelbarrow is essential for transporting concrete mix, gravel, and water, which you’ll mix with a hoe in a tub. Cutting fencing materials requires fence pliers, wire cutters, and a hacksaw or reciprocating saw for precise cuts. To tighten bands and bolts, use a socket wrench, while a fence stretcher helps apply tension to fabric fences later on. Choose galvanized steel terminal posts, line posts, and brace posts to ensure durability. For a long-lasting installation, always set posts in concrete to anchor them against shifting ground conditions. Post caps are available to protect terminal tops from moisture; selecting the right ones helps extend your fence’s lifespan. If you’re considering wood posts in a future upgrade, think about fence stain options ahead of time. Keep a supply of tension bands, rail end bands, and tie wire on hand to secure everything firmly in place. For those also starting a backyard chicken coop, consider these same materials to build a secure enclosure. When removing old posts, using a specialized puller can save significant time and effort compared to manual digging.
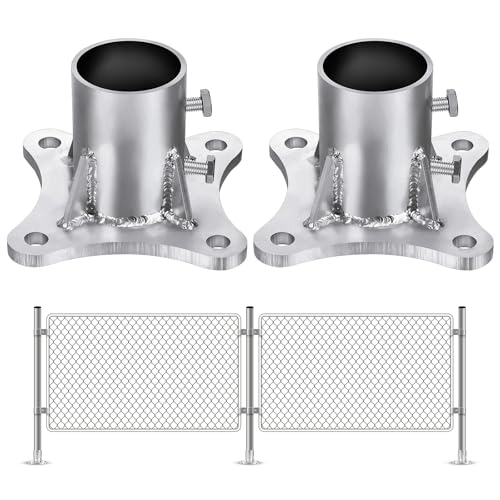
Standard Size: you will get 2 piece of Chain Link Fence Post Floor Flange, Fits standard 2-1/2" nominal posts with a 2-3/8" actual outside diameter; The base opening measures 2-3/4" and is secured by two side set screws, the base measures approximately 6 1/2" x 6 1/2", 4 1/4" in height, and needs to be ground fixed with four 3/4" screws (not included); Note: hole is slightly larger for easy insertion, centered locked by side screws

Package: you will get 1 pieces 5” X 5” vinyl fence posts, actual size width 4 5/8” x 4 5/8” x 46.5" long; Our pack comes with 4 pieces of 3/8"x3" concrete wedge anchors, 4 pieces of 3/8"x3" hexagonal lag screws, and 8 pieces of 3/8" flat washers

One-Piece QT450-10 Ductile Iron Construction: Cast from high-strength QT450-10 ductile iron in a single piece, this heavy-duty flange bracket combines classic aesthetics with industrial-grade durability. Perfect for securing chain link fence posts, mailboxes, lamp posts, and steel round tubing to concrete foundations.
Plan Your Fence Layout and Mark Post Locations
To turn your fence plan into a concrete reality, start by locating your property lines and setting terminal stakes about 4 inches inside those lines. This small offset ensures that your footings do not encroach on neighboring land. Mark the positions of the end, corner, and gate posts first; these define your fence perimeter and are critical for accurate layout. Stretch a taut mason’s line between these stakes to visualize the fence path clearly. Use the 3-4-5 method to square every corner—by measuring 3 units along one stake, 4 units along the other, and ensuring the diagonal between these points is 5 units, you create perfect right angles. This precision prevents cumulative errors and ensures your fence looks straight and professional. Once the corners are squared, mark the centers for all the posts along the string with spray paint or chalk. Because terminal posts set the foundation for the entire fence, take your time placing them accurately; proper placement guarantees a straight fence that complements your yard’s aesthetic. Applying a similar principle of cost savings can be achieved by fermenting chicken feed to reduce waste and expenses. For those interested in further reducing expenses, building a DIY chicken feeder from scratch can be a more affordable alternative to purchasing a ready-made kit. Choosing the best feed options is also critical for ensuring healthy broiler chicken growth and overall flock profitability.

DOES NOT COME WITH THE MagnaLatch GATE LATCH OR MAGNETIC STRIKER – The kit comes with a variety of round–post shims sizes to mount the MagnaLatch. MagnaLatch latch and magnetic striker, must be purchased separately
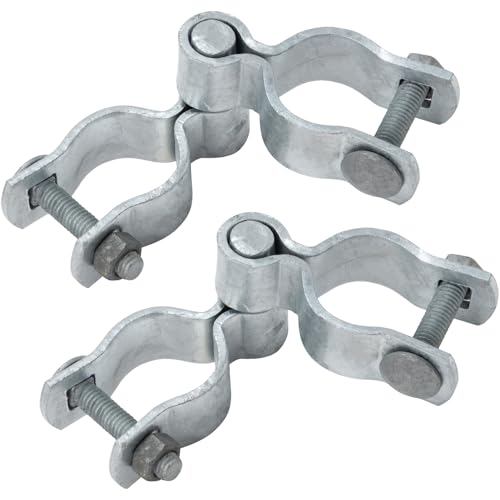
【1-5/8" GATE HINGE SET】Male gate hinge suits for 1-5/8" OUTER DIAMETER post; Female gate hinge suits for 1-5/8" OUTER DIAMETER frame; Pin diameter is 5/8".

25.2" fence extension height for top of fence, 2.2" bracket, bolts and nuts included
Selecting Post Size, Depth, and Spacing for Your Fence
Choosing the right post size, depth, and spacing is essential for a durable chain link fence. For line posts, use 1-5/8 inch diameter for fences up to 4 feet high. Increase to 2 inches for fences over 5 feet tall to provide additional support. Terminal and corner posts should be 2 to 2-1/2 inches in diameter, offering extra stability at fence ends and corners. Bury one-third of each post in the ground, but always go deeper if your soil is weak or if local frost depth requires it. For a typical 6-foot fence, dig at least 30 inches deep; in colder climates or poor soil, go even deeper to prevent shifting or frost heave. For cutting wire mesh and tie wires during installation, many flock keepers use wire cutters called dikes for their sharp, flush-cutting jaws. To properly secure the chain link fabric to the line posts, you should use T post clips for a firm and lasting attachment. Similarly, when providing oyster shell supplements to chickens, ensure it is offered free-choice in a separate feeder from their regular feed to prevent overconsumption.
Spacing between line posts should generally not exceed 10 feet, with closer spacing—such as 6 to 8 feet—in areas subjected to high wind or where privacy slats are installed. For longer runs, divide the distance evenly to avoid short end sections, which are more likely to settle or shift over time. Remember, taller fences require thicker and deeper posts, so always match your post size and spacing to the specific height and environmental conditions of your installation.

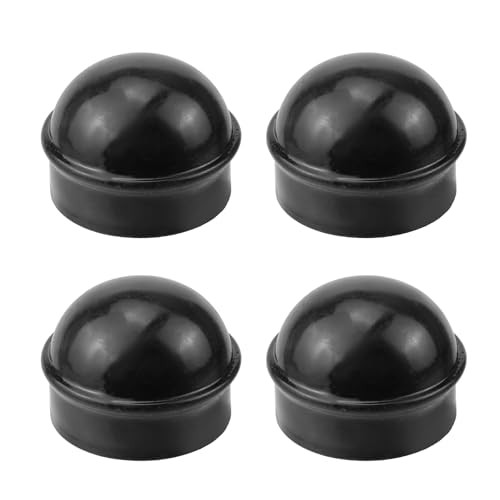
Specifications: OD: 52mm/2.05 inch; ID: 2 inch, fits for 2" outer diameter fence post.

Setting Terminal, Corner, and Gate Posts Correctly
To set your terminal, corner, and gate posts correctly, start by marking their locations precisely according to your layout and post spacing. Offset concrete footings slightly to respect property lines, ensuring the posts are positioned accurately. When spacing gate posts, include hinge and latch allowances—3¾ inches for a single walk gate and 5½ inches for a double drive gate—to facilitate smooth operation.
Post hole dimensions for terminal posts should be 8 inches wide and between 18 and 36 inches deep. These deeper holes help support heavier loads and prevent shifting over time. Center each post carefully, checking that it is perfectly plumb with a level on adjacent sides. Set terminal posts higher than line posts, typically at fabric height plus 2 inches, to accommodate the fabric and prevent sagging. Choosing a chicken saddle for hens requires a similar attention to fit and support to avoid discomfort.
Use a 1:2:4 concrete mix for setting the posts, and ensure the top slopes away from the post to shed water and protect against rot. Diagonal bracing from corner or end posts to the nearest line post helps maintain stability during curing. Gate posts require horizontal braces and truss rods to handle hinge and latch stresses. Keep all posts braced until the concrete has fully cured, preventing sagging, twisting, or leaning under tension. Using cost-saving tips like assembling your own feed bin can similarly reduce overall fencing project expenses. When using plastic posts, remember to check for UV resistance to ensure the material holds up long term against sun exposure.

Standard Size: you will get 1 piece of Chain Link Fence Post Floor Flange, Fits standard 2-1/2" nominal posts with a 2-3/8" actual outside diameter; The base opening measures 2-3/4" and is secured by two side set screws, the base measures approximately 6 1/2" x 6 1/2", 4 1/4" in height, and needs to be ground fixed with four 3/4" screws (not included); Note: hole is slightly larger for easy insertion, centered locked by side screws

𝗙𝗔𝗖𝗜𝗟𝗜𝗧𝗜𝗘𝗦 𝗟𝗜𝗙𝗘: Your life is made easier by Fence Post because it is quick and easy to mould, shape, and adjust by following clear instructions. For preparing the expanding concrete foam, no further materials are required. There is no need for extra mixing equipment or water. The kit is bundled with everything needed

【Compatibility】The chain link fence post flange is compatible with 2 1/2-inch pipes with an outer diameter of 2 3/8 inches, suitable for chain link fence posts, streetlight poles, mailboxes, and cylindrical bases for fence posts, providing universal installation compatibility.
Line Post Installation: Alignment Tips for a Straight Run
To ensure a straight run of fence posts, start by stretching a taut mason’s string between your fixed terminal, corner, or gate posts to establish a true reference line. Keeping the string tight prevents sagging and helps all posts align horizontally. Mark equal spacing for each post—typically 10 feet on center for residential fences—before digging. When placing each line post, set it so that it touches the string, leaving about a 1/4-inch offset away from the line, which helps maintain the string’s position and prevents bumps. Similarly, when installing roosting bars, the optimal bar height ensures birds can perch comfortably and safely. For the chicken coop roof, using a shade cloth can help regulate temperature and protect birds from direct sun exposure. Ensuring your flock has engaging top chicken toys can reduce boredom and pecking issues. Ensure each post is perfectly plumb both sideways and front-to-back by checking with a level. Control the height by aligning the string approximately 4 inches below the top of terminal posts. Recheck alignment frequently as you install each new post, as early posts influence the visual line. Measuring the spacing again after each post is set prevents cumulative errors from drifting off the line. Consistently checking string tension, post offset, height, and plumb at every step results in a clean, straight fence line.

Chain link fence ties are made of 12 gauge aluminum wire, easy to install and bend by handle without pliers

The ideal solution for preventing pets from jumping or climbing your chain link fence
How Long Should You Let Concrete Cure Before Tensioning?
Concrete should be allowed to cure for at least 24 to 48 hours before tensioning the fence. This curing period ensures the concrete develops sufficient strength to hold the posts securely. However, weather conditions can extend this timeline. Cold or wet weather slows the curing process, so you might need to wait 72 hours to 5 days before applying tension. Fast-setting concrete mixes can reduce this wait time, but always follow the manufacturer’s instructions. A cautious approach involves waiting about 2 to 3 days before attaching hardware, and at least 5 days before tensioning devices like gates. Rushing too early risks shifting your posts before the concrete gains enough strength, which can compromise the fence’s stability. The goal is to reach early “working strength,” not waiting for a full 28-day cure, but patience pays off for lasting results.
5 Most Common Post Installation Mistakes to Avoid
Avoiding common mistakes during chain link fence post installation can save you time, money, and frustration later. First, don’t skip layout planning. Setting terminal, corner, and gate posts first ensures proper alignment; uneven spacing creates weak points and sags that compromise the fence’s strength. Second, dig holes at least 24 inches deep with a bell shape. Shallow footings lead to leaning and will often require expensive post repair down the line. Third, keep posts plumb and level during installation. Crooked posts are difficult to fix once concrete hardens, so check carefully before the concrete sets. Fourth, always use properly mixed concrete with a slight slope or crown to facilitate drainage. Poor footing drainage causes instability and shortens the lifespan of your fence. Finally, consider the terrain and hardware requirements. Overspaced line posts overload the fence fabric, leading to sagging, while skipping tie-wire results in loose fabric that can be easily damaged. Following these tips helps you avoid costly rework, ensuring your fence remains straight and durable for years. For additional protection, you can apply DIY winter insulation techniques to your post base to prevent frost heave in cold climates. Unlike flimsy wooden alternatives, metal nesting boxes resist corrosion and provide long-lasting structural stability for outdoor installations.