

Looking to save money on chicken feed and create a pest-resistant feeder? You can build a simple, effective chicken feeder for under a dollar using materials like a 5-gallon bucket or PVC pipe. It’s easy to customize the size of the feed ports and block pests without complex tools.
Keep reading for step-by-step instructions to make your own chicken feeder with supplies you likely already have.
Why Build a DIY Chicken Feeder Kit Instead of Buying One
Building a DIY chicken feeder kit is more cost-effective than buying one, often costing less than a dollar when you reuse common items like buckets or PVC pipes. This approach significantly cuts expenses, especially if you already have these materials on hand. For example, using a DIY cracked corn approach can further reduce feed costs by processing whole grains yourself. Homemade feeders also minimize waste—by designing them to limit spillage, you keep feed off the ground, reducing waste and saving money over time. Plus, fewer spills attract fewer rodents, helping keep pests at bay around your coop. You can customize your feeder’s size to match your flock’s feeding schedule, reducing daily trips for refilling. Covering your DIY design protects feed from rain and dirt, which promotes healthier chickens. For quail keepers, similar strategies apply, as dedicated quail housing can also be built affordably from scrap materials. You can also reduce costs by using common scrap materials like repurposed buckets or leftover lumber for assembly. Overall, building your own feeder creates a cleaner, more efficient setup that saves you both money and time.
Which Design Works Best for Your Flock Size
For 2 to 6 chickens, a compact gravity feeder with one port per 3 to 4 birds is ideal. This size prevents wastage and ensures each hen has easy access to feed. Larger feeders may be unnecessary and could lead to stale feed or excess waste in smaller flocks. Adjust port size and quantity based on flock size to maintain efficiency and keep feed fresh. Always match your feeder’s capacity and design with your flock’s size to reduce refilling frequency and minimize waste. Hemp bedding, such as the top options reviewed, provides excellent moisture absorption for coop floors, keeping the environment dry and healthy for your flock. For a more energy-efficient setup, consider pairing your feeder with a solar heater for chicken coop to keep feed from freezing in cold weather. For hatching chicks that will grow into the flock, you might also consider an incubator like the Top Quail Egg Incubators reviewed for consistent temperature control.

Small pet-food dispenser for dog or cat; uses gravity to ensure a consistent supply of kibble

No-waste design: Chicken feeder features a no-waste design with the feed opening extending downward, solving the problem of spilled feed, avoiding feed waste and providing a cleaner coop for your chickens. With the chicken feeder you can feed your chickens efficiently, avoiding mess and waste, saving you money and time. We recommend a distance of 3 inches between the feeder hole and the bottom of the bucket

[NO-WASTE DESIGN]: The feeder inlet extends downwards by 0.8 inches, which helps prevent uneaten feed from spilling out, effectively reducing feed waste and mess, keeping the chicken house clean, and thus saving you cleaning time and feed costs.
The Tools and Materials You’ll Actually Need
To build a functional poultry feeder, you’ll need a selection of specific tools and materials. Choose a 3- to 4-inch PVC pipe or a 5-gallon food-grade bucket for the main body. Collect a shallow feeding pan, PVC caps, elbows, and a wye or T connector to shape the flow of feed. Use exterior-grade screws, bolts, nuts, washers, and PVC cement for secure assembly and durability. Consider that a quality chicken coop with run provides a controlled environment that complements a well-made feeder by reducing dust and spillage.
For tools, gather a cordless drill, a hole saw bit, a hacksaw, and a file to cut and smooth materials. A tape measure and marker help you measure and mark precise cut lines and mounting points. Safety glasses are essential to protect your eyes during cutting and drilling. A rubber mallet can assist in gently fitting parts together without damaging them.
Ensure your design includes properly sized access holes to prevent blockages and irregular feed flow. Stable mounting is crucial to keep the feeder in place and avoid spillage. Sharp edges can trap debris or harm your flock, so smooth all cut edges with a file. Use food-safe materials to protect your birds’ health, and place the feeder in a well-ventilated area to prevent moisture buildup, which can spoil stored feed. To maintain a consistent feeding environment, monitor the brooder temperature near the feeder, as heat stress can reduce chick appetite and feed intake.

Chicken Feeders No Waste: This feeders are mounted on the wall of chicken coop, allowing chickens to feed without creating a mess. By inserting their heads, they access a continuous supply of food, reducing waste and cutting down on feed costs

Minimize Waste: The feeding opening is not big which can minimize the spilled and wasted feed; this pvc chicken feeder kit also keeps the feed clean; with 3 lids, this chicken gravity feeder is easy to refill and easy to clean

Easy install, come with a 3.15"/80mm hole saw, make an outdoor chicken feeder in a minute
Step 1: Measure and Cut Your PVC Pipe Sections
Measure your PVC sections accurately by inserting the tape measure into each fitting until it reaches the internal stop. Mark the pipe at this point, ensuring your measurement accounts for the full fitting length, not just the raw pipe. Use a pencil or chalk to draw a square cut line around the circumference for a straight, perpendicular cut. Proper alignment is crucial; any angle can prevent the pipe from seating correctly. Secure the pipe firmly in a clamp or vise to prevent slipping during cutting, which helps produce an even, clean edge. Make slow, controlled saw strokes to avoid rough cuts or uneven edges. After cutting, deburr and smooth the ends with a file or sandpaper to remove burrs and sharp edges, making handling safer and ensuring a tight fit. If desired, consider material alternatives like ABS for a different aesthetic, but keep in mind the appearance should match your overall coop style. Always double-check your measurements before marking and cutting to avoid mistakes. Remember, measuring from end to end provides the direct overall pipe length needed for accurate cutting.

Ratchet Drive Technology: This PVC cutter tool, specifically designed as a Pex/Pvc cutter, adopts an advanced ratchet drive system that's easy to rotate, enabling fast, efficient, and labor-saving cutting

【Premium Quality】:DOMINOX-We are a factory specializing in the design and production of cutting tools. In our responsibility to customers and confidence in products. If there is any problem with item, please don`t worry and Dominox will always be here to help solve the problem.

High Performance: The SHALL PVC pipe cutter consists of durable and corrosion resistant die-cast aluminum body and the wear resistant SK5 blade with Teflon coating; The V-shape design at the edge of blade makes the tube cutter easier to penetrate the pipe, causing less damage and keeping the cut neat
Step 2: Assemble Your No-Glue PVC Feeder Body
Start assembling your PVC feeder body by dry-fitting all the cut sections and fittings before any cement is used. Select fittings that press-fit snugly to create a secure friction hold without glue. Keep all parts loose at this stage to identify any alignment or angle issues before final assembly. The offset gutter adapter should be positioned towards the top to slow feed loss and facilitate cleaning.
Arrange the pipe, elbows, and cap-adapter pieces so the feeder stands straight and the feed flows smoothly. Position the outlet section downward for easy access by birds. Use pipe straps or bungee cords to stabilize the mount if needed. Feel free to customize the design by swapping elbows or adjusting the height to fit your coop space. While pliers and wire cutters serve different roles, wire cutters are the more effective tool for trimming any sharp PVC edges.
Maintain a modular setup by ensuring the top cap is removable for refilling. The friction-fit joints allow you to easily rinse or redesign the feeder later. Check all connections for wobble, gaps, or sharp edges. When complete, your dry-fit body should be aligned, stable, and ready for final assembly.

CHICKEN FEEDERS NO WASTE: The hanging chicken feeder is installed on the wall, the chickens just stick their heads in and get constant food, instead of standing on the food and pulling the food everywhere with feet, minimizing food waste and feed costs

No-waste design: Chicken feeder features a no-waste design with the feed opening extending downward, solving the problem of spilled feed, avoiding feed waste and providing a cleaner coop for your chickens. With the chicken feeder you can feed your chickens efficiently, avoiding mess and waste, saving you money and time. We recommend a distance of 3 inches between the feeder hole and the bottom of the bucket

Upgrade Poultry Feeder: The internal height of our poultry feeder port has been increased by 0.6 inches. The clever design effectively reduces 30% feed spillage and mess. Every grain of feed is fully utilized, allowing the chicken coop to say goodbye to messiness and maintaining a clean automatic dining environment for the flock
Step 3: Drill Feeding Ports in Your Bucket Feeder
To drill feeding ports into your bucket, use a 3-inch hole saw, which is standard for most kits. Mark each hole 4 inches above the bucket’s bottom to ensure proper gravity flow. Space the ports evenly around the lower third of the bucket for balanced access and to prevent crowding. Drill at a low speed to avoid melting the plastic and to keep the edges clean. After drilling, sand down any burrs to improve the seal and reduce sharp edges that could harm birds or cause leaks. Using a food-grade bucket cleaned of any prior hydraulic fluid residues further ensures material safety despite the polyethylene origins. Chicks can transition to this feeder only once they are old enough to consume layer feed without risk of excess calcium. Compared to chicken wire, hardware cloth offers superior durability with its welded wire mesh construction.
Install each port with the feed opening facing downward and the rain shield facing upward to prevent water from entering. Tighten the retaining nut snugly—firm but not excessive pressure—to avoid cracking the plastic. Properly finished edges help maintain a good seal, which extends the lifespan of your feeder and makes cleaning easier.

Package Includes: 1 pc 3" hole saw, 1 pc arbor with drill bit, 1 pc pilot drill bit (replacement), 1 pc hex key

Deep Cut Capacity - The hole saw offers a 2-3/8" cutting depth, allowing for 40% deeper holes in a single pass compared to standard hole saws, significantly increasing productivity and reducing the time spent on drilling tasks.
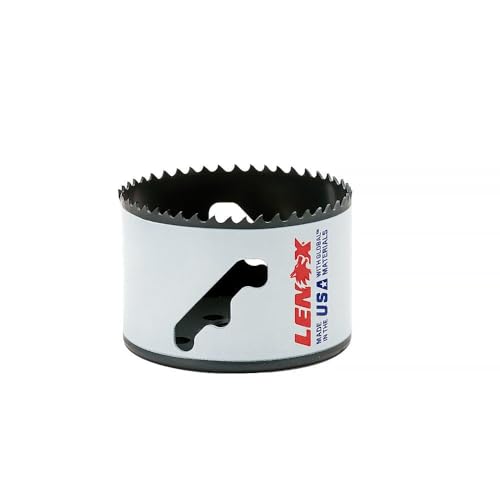
Speed Slot features a staircase design for easy plug removal
Hang Your DIY Chicken Feeder Kit for Pest Control
To block rodent access along the hanger, add a smooth baffle like a wide plastic bowl above the feeder. This creates a barrier that rats cannot climb down to reach the feed. Place the entire feeder inside a pest-proof run or enclosure to minimize exposure and prevent pests from accessing the feed area. The color of the feeder does not influence pest control effectiveness, but selecting a dark hue can help hide dirt and spilled feed, keeping the setup cleaner. For lasting stability, use correct spacing when setting the posts of the enclosure so the wire mesh remains taut. Regularly inspect the hardware for signs of wear or damage and clear spilled feed promptly to make the area less attractive to pests. For added durability in the hanger, V clips are often a better choice than J clips for securing the feeder wire. For cutting the wire mesh of the enclosure, you will need top wire cutters that are sharp and durable enough to handle chicken wire.
Align Feed Flow to Stop Waste and Spills
To align feed flow and prevent waste and spills, start by narrowing the feed opening. Use small access ports to limit scratching and beak flicking, and opt for adjustable openings so you can match feed output to your flock’s size. Keeping feed levels low—about one-third full—helps prevent overflow during pecking. This controlled flow reduces the risk of piled-up feed tumbling out and creating waste. Incorporate angled or recessed surfaces inside the feeder to guide feed inward and catch spills before they reach the ground. Ensure your feeder sits level and stable; tipping or swinging causes uneven flow and scatter. For inspiration on stable designs, consider adapting the wood-frame construction commonly used in quail coops to keep the feeder securely in place. These adjustments focus on design features that cut waste and keep more feed in the trough. Applying a thin, even layer of diatomaceous earth around the feeder base can further deter insects attracted to spilled grain. For precise portion control, a 3 quart feed scoop holds roughly 2.5 to 3.5 pounds of standard crumble or pellet feed.
Add Weather Seals and Rodent Barriers to Your Feeder
Sealing weather protection and rodent barriers are essential for a secure and dry chicken feeder. Start by sealing lid-to-body seams with outdoor-rated silicone or PVC solvent cement to create a watertight bond that prevents moisture from seeping in. Add rubber weatherstripping around removable covers to reduce gaps where water could enter. To prevent rodents from invading, use 1/4-inch hardware cloth because it blocks small rodents while allowing chickens to access the feed comfortably. Galvanized steel mesh is a better option than softer plastics, as it resists chewing and damage. Keep feeding ports narrow enough for chickens to use but too small for rats to squeeze through. Reinforce all corners with staples or brackets to prevent gaps from forming over time. Elevate your feeder and install treadle-style mechanisms so feed remains hidden until a chicken activates it. Additionally, trim grass surrounding the feeder to eliminate hiding spots and make rodents less likely to approach unnoticed. A specialized design like that of the Roamwild feeder ensures it is 100% rat proof and pest proof, maintaining feed exclusivity for chickens. For a complete winter setup, you can incorporate weather seals from your DIY coop build to protect the feeder’s storage bin from snow and ice.
Test Your Feeder and Fix Common Problems
Perform a feeder flow test after assembling and sealing your feeder to ensure smooth operation. Fill the feeder just below the hole level and observe whether feed flows freely into the pan without sticking or bridging. If the feed moves slowly or gets blocked, clean any plastic residue from the openings. Changing your feed formulation requires rechecking, as grain size influences discharge consistency and the nutritional quality your chickens receive. For optimal performance in hot weather, consider best shade cloths for the coop to keep feed cool and prevent moisture clogs. Place the feeder on flat ground to check for spills. Overfilling or improper height allows chickens to rake out feed too easily, leading to waste. Gently press on the feeder to confirm it remains stable; tighten screws if it shifts. The ideal height is chest level for your flock, making access easy without encouraging spillage. If feed clogs or moisture affects the lid, secure it tightly. Level the base and retest to prevent uneven distribution. Repeated problems often indicate worn parts or leaks, so inspect and replace components as needed.