

Wondering how to build a simple, effective quail feeder that saves feed and keeps pests out? With just some PVC pipe, basic tools, and a few hours, you can create a custom feeder that minimizes waste and contamination.
It’s an affordable project that makes caring for your quail easier and cleaner. Keep reading to get all the details for a perfect build.
Why Build a DIY Quail Feeder Instead of Buying One
Building your own quail feeder allows you to customize it for your flock’s needs while saving money. You control the size and capacity from the start, so you avoid overspending on a commercial model that’s too large or too small. Using inexpensive materials means you can create a durable, functional feeder without breaking the bank. This design also avoids the ineffective commercial feeders like Mason jar models that often fail to contain feed properly. Feeder quality is especially important because, as noted in reviews of top chicken coops, a well-constructed unit directly impacts long-term performance and durability for your birds. Additionally, using hardware cloth for the feeder ports ensures that mice cannot chew through the mesh to access the feed. A similar approach to building a feed bin can also dramatically cut costs by repurposing scrap lumber and sheet metal.
A key benefit of a DIY port-style design is reducing feed waste—up to 20 percent—by stopping quail from flicking feed onto the ground. This waste reduction means fewer trips to replace feed and overall savings. Enclosed feeders also protect grain from moisture, droppings, and debris, keeping feed fresh and preventing spoilage and pests.
With a custom height and port size, you can make feeding easier and cleaner for your birds. Plus, a DIY feeder requires less maintenance because you can access and clean it more efficiently than many store-bought options. Building your own not only saves money but also results in a smarter, more efficient feeding system tailored specifically to your flock.
Tools and Materials for Your DIY Quail Feeder
To build your DIY quail feeder efficiently, you’ll need a focused set of tools and materials. A drill and hole saws are essential for cutting PVC pipe and plastic containers accurately. A hacksaw can also be used for precise cuts on thicker plastic or PVC. Use a tape measure to ensure correct lengths and spacing, a marker to mark cut points, and a level to keep your feeder aligned properly. Safety gear such as glasses and gloves is crucial to protect yourself during cutting and assembly. For attaching parts, gather zip ties, screws, PVC glue, and silicone sealant. You may want to customize the look by painting or taping your feeder to match your coop’s style. Decorative touches like patterned lids or painted caps can add a personal flair while keeping feed clean. Remember to smooth any sharp edges with sandpaper and always select food-safe materials for any parts that will contact the feed. To further reduce costs, you can substitute used wires and zip ties for new materials, emphasizing resourcefulness and cost savings. For additional protection from the elements, consider using a shade cloth to cover the feed area and keep quail comfortable during hot weather. For optimal performance, ensure your feeder design complements the temperature and humidity settings used in a top quail egg incubator to maintain consistent hatch rates.

✅This is a set of automatic water replenishment system. No leak and keep your coop dry.

Minimize Waste: The feeding opening is not big which can minimize the spilled and wasted feed; this pvc chicken feeder kit also keeps the feed clean; with 3 lids, this chicken gravity feeder is easy to refill and easy to clean
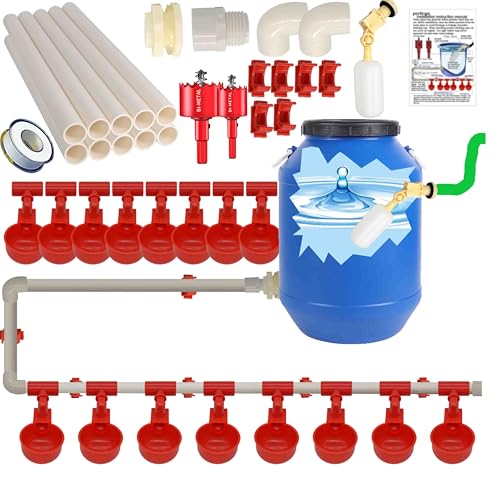
All DIY accessories are included, you just need some extra PVC glue.
How to Choose the Right PVC Pipe Size
A 3-inch PVC pipe is the ideal size for most quail feeders because it offers a good balance between storage capacity and functional access. This diameter prevents bridging, which can cause feed jamming, and allows for smooth gravity flow, reducing the need for frequent refills. It also accommodates most game birds without risking overflow or feed spillage. While a 2-inch pipe can work, it has a higher tendency to jam if ports are not cut precisely. A 1½-inch opening discourages scratching but limits feed volume, making it less suitable for larger groups. Only consider a 4-inch pipe if you need a larger reservoir for multiple birds; for typical setups, 3 inches hit the sweet spot. Remember to match the port diameter to your bird’s head size for efficient feeding and minimal waste. Smaller ports help control waste better, especially with smaller birds. To ensure a steady supply of feed, storing the pipe in a cool location helps prevent black soldier fly larvae from causing contamination if they enter the feeder area. Using a hygrometer inside the incubator ensures proper humidity levels for egg development, which is critical for hatch rates. For the best performance, choose shavings that prevent feed jamming and ensure a clean, dry environment in your feeder area.

🐓【Automatic Chicken Feeder】Our Chicken Feeder Is Mounted On The Wall, Allowing Chickens To Access Food By Simply Sticking Their Heads In. This Design Prevents Chickens From Standing On And Scattering The Feed, Significantly Reducing Food Waste And Lowering Feed Costs.

【CUSTOM NO-WASTE PORTS KEEP MORE FEED IN】Built around three custom 1.5-inch feeding ports, this feeder gives adult Coturnix quail comfortable access while making it harder to rake feed out with their feet or scatter it with side-to-side head movements. More crumble stays inside instead of piling up on the cage floor, helping you cut daily mess, waste less feed, and get more value from every bag.

【Premium & Durable PVC Material】This pvc chicken feeder is constructed from high-quality PVC with a wall thickness of approximately 0.2 inches, ensuring excellent sturdiness and wear resistance. Easy to wipe clean, and effectively keeps the feed dry and fresh.
Step 1: Cut Your Feed Reservoir to Length
Cut your feed reservoir to the precise length needed for your setup. Measure the available feeder space first to ensure the reservoir fits your cage opening. Use the final installed length—not the raw pipe length—taking into account the dimensions of elbows and caps. For straight sections, match the usable feeding span; for example, a 22-inch section fits well in a 24-inch cage.
Mark a square cut line around the pipe to create an even, straight end. Avoid angled cuts, as they weaken fitting contact. Use a pipe cutter or saw, keeping the section straight to prevent tapered ends. Deburr internal shavings and smooth the outside edge to ensure full seating of fittings. Proper beveling and edging prevents leaks and joint failures by enabling smoother insertion. Hardware cloth provides superior durability compared to chicken wire for enclosures that must withstand constant pecking and scratching. If you need to remove old posts from a cage foundation, using a specialized puller can save significant effort compared to manual digging. A quality layer feed supports consistent egg production in healthy chickens.
Before proceeding, check the fit against your cage. Consider color options for better visibility or select alternative materials like ABS if PVC isn’t available. Save the cut piece as a reference for your project.

Ratchet Drive Technology: This PVC cutter tool, specifically designed as a Pex/Pvc cutter, adopts an advanced ratchet drive system that's easy to rotate, enabling fast, efficient, and labor-saving cutting

High Performance: The SHALL PVC pipe cutter consists of durable and corrosion resistant die-cast aluminum body and the wear resistant SK5 blade with Teflon coating; The V-shape design at the edge of blade makes the tube cutter easier to penetrate the pipe, causing less damage and keeping the cut neat

Ratchet Drive Technology: This PVC pipe cutter tool, specifically designed as a Pex/Pvc cutter, adopts an advanced ratchet drive system that's easy to rotate, enabling fast, efficient, and labor-saving cutting.The hose cutter tool is well constructed to ensure clean and even cutting
Step 2: Mark and Drill the Feed Access Holes
You should mark and drill feed access holes that are 1.75 inches in diameter for your adult coturnix quail. This size strikes a balance between preventing excessive feed loss and allowing easy access for the birds. Position the holes about 3 to 3.5 inches from the bottom of the container to keep the feed level below the opening, minimizing spillage. Space 4 to 6 holes evenly around the container, with two on each side if you’re using compact feeders. Proper spacing ensures multiple birds can access food simultaneously without crowding. The hole dimensions also help reduce non-target access by mice, rats, sparrows, and doves. When cutting wire for feeder reinforcement, many flock keepers use wire cutters called dikes to make precise, safe cuts. For additional protection, consider incorporating a chicken run structure around the feeding area to deter predators. Using a 19 gauge hardware cloth over the holes can further block rodents and larger pests from accessing the feed.
Use a backing board inside the container when drilling to stabilize the wall and reduce kickback. Start with a pilot hole to guide your hole saw, which makes the process smoother and safer. After drilling, smooth any rough or jagged edges to prevent injury to your quail. Filing or sanding the edges creates an internal lip that helps reduce waste and keeps the feeder more efficient.
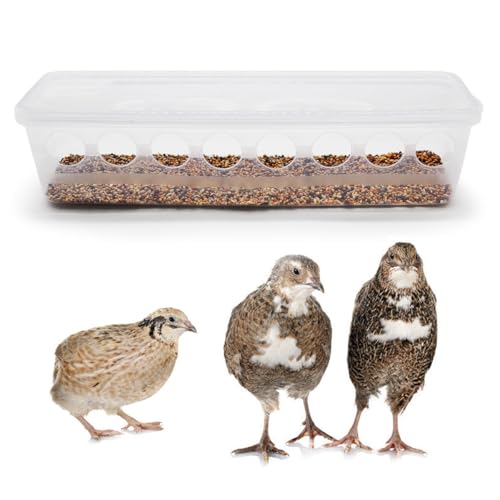
Product size: approximately 11.8 inches x 2.9 inches x 3.0 inches.

【100% SPACE SAVED, 0% POOP IN FEED】Give your quails more room to move! By hanging the feeder outside the cage, you instantly free up floor space and keep their meals totally clean. Because the quails can't step in the feeders, they can't poop in it or kick dirt into their food.

Waste-reducing funnel design: Features innovative anti-scatter ports that guide quail to feed centrally, significantly minimizing spillage and feed waste.
Step 3: Add No-Waste Elbows and Ports
Installing no-waste elbows and ports requires careful placement and secure fitting to minimize spillage. Start by selecting PVC elbows, with a common low-waste layout using 90-degree elbows arranged in an inverted “candy cane” shape. This design directs feed straight into accessible ports, reducing scatter. These ports are made from durable, washable poly high-density PLA plastic that is resistant to rust, rot, and corrosion. For younger birds, feeding chick starter is typically recommended until they reach 6 to 8 weeks of age, though this duration varies by breed and growth rate.
Use a 1.75-inch outside diameter hole to create ports that fit snugly without the need for glue. Port collars feature an internal lip that helps keep feed inside the feeder while allowing quail to peck comfortably. PVC options come in white, black, or gray, so you can match or complement your coop’s aesthetic.
Secure each elbow and port with hot glue or silicone caulk to prevent movement as the birds peck repeatedly. Space four to six ports evenly around the feeder, keeping horizontal sections short to limit feed movement and waste. This assembly results in a low-maintenance, waste-proof feeding system.

Package contains: 12pcs 0.5inch white PVC fittings elbow 90 Degree 2-Way slip socket adapter connectors to meet your replacement needs

ADDS A 90-DEGREE TURN:As part of a complete drainage system, the PVC elbow adds a 90° turn to the pipeline as it connects two pipes of the same type and diameter size together; it can also add a 90° turn from drainage product to drain pipe

MAKES A 90-DEGREE TURN; HUB X SPIGOT CONNECTION: As part of a complete drainage system, the PVC Long-Turn Street Elbow adds a 90° turn to the pipeline as it connects two pipes of the same type and diameter size together for a Hub X Spigot connection
Step 4: Assemble, Seal, and Mount Your Feeder
To assemble, seal, and mount your feeder correctly, start by dry-fitting all PVC sections to confirm alignment and height before applying any adhesive. Using a level surface during assembly helps prevent twisting under the weight of feed. Leave removable parts unglued to allow for easy cleaning and refilling. Apply a continuous bead of waterproof sealant around every joint and port, filling small gaps to prevent quail from flicking feed out. Thorough sealing is essential since birds tend to peck at loose spots, which could lead to feed spillage. For outdoor use, tighten threaded components firmly but carefully to avoid cracking the pipe. Mount the assembled feeder securely to a stable wall or panel using screws and washers, ensuring that it is level. A level mount prevents uneven spillage and helps with the stability of the feeder during daily use. For harsh weather conditions, this feeder is made from high-quality galvanized steel that is resistant to rust and corrosion, ensuring durability. When raising quail, keep in mind that straight run chicks are unsexed, meaning males and females are mixed together in a single group. Using a metal roof over the mounted feeder can provide additional protection from rain and snow. For a more permanent enclosure, chain link fence offers greater durability and weather resistance compared to other fencing options. Regularly check fasteners, as vibration and pecking can loosen them over time, and re-tighten as needed to maintain safety and function.
Set Feed Ports at Quail Eye Level
Setting feed ports at quail eye level is essential for effective feeding. Position the opening at the bird’s chest or back height to ensure they eat comfortably and minimize feed waste. This placement encourages a natural feeding posture, with a slight upward-and-inward reach that reduces “billing out,” the flicking motion that scatters feed across the enclosure. The same principle of roll-away design applies to minimizing waste in larger poultry setups, where angled access points keep birds from soiling their feed.
Port dimensions are important: adult Coturnix quail need openings about 1.5 to 2 inches wide, while button quail require approximately 1 inch. It’s crucial to avoid making the port too large, which can lead to spillage, or too small, which may prevent easy access for the bird. Also, do not let the birds enter the port entirely; it should be just wide enough to allow feeding without giving them access to the interior.
Ports placed too low can trigger floor-feeding behavior, leading to more scratching and feed waste. Conversely, ports set too high may leave feed out of reach at the bottom, increasing spoilage risk. For pens with mixed ages, set the port height based on the average size of adult birds and provide a temporary step for younger birds to access feed comfortably. A Rite Farm Products 8 Port 6 Quart feeder features an anti-waste port design that minimizes feed loss when positioned correctly.
Observe your flock’s behavior and adjust accordingly: if birds are stretching excessively or straining to reach, lower the port. If they scratch or bob their heads excessively, raise it slightly. Proper placement of feed ports keeps feed contained and ensures your quail feed cleanly and comfortably.
Mount Your Feeder With Hooks, Zip Ties, or Chains
To secure your feeder, use hardware that can support its weight and withstand outdoor conditions. Galvanized or stainless steel hooks screwed into a structural joist or rafter provide a reliable anchor point. Before filling the feeder, give the hooks a firm tug to ensure they hold securely.
Zip ties are a convenient temporary solution but are less durable in outdoor environments. Opt for UV-resistant, exterior-grade zip ties for initial placement, then upgrade to rated metal hardware for long-term use. Chains allow for easy height adjustments; use equal-length sections on each side to keep the feeder level and minimize swinging. For more robust options, consider reviewing top chicken toys that also use durable hanging hardware for outdoor coops.
For enhanced durability and aesthetics, consider powder-coated chains that resist rust. Alternative materials like snap hooks with locking closures can prevent loosening from vibration. Always match the hardware’s strength to the fully loaded weight of the feeder, not the empty weight, and regularly inspect connections for signs of wear or deterioration.
Keep Your Feeder Clean and Your Quail Healthy
Check your feeder daily after rain or high humidity. Moist feed should be discarded immediately to prevent mold and bacterial growth, and it should not be mixed with fresh feed. Elevate the feeder above the bedding to reduce contamination from droppings. Several times a week, clear spilled feed and hulls from the area to maintain cleanliness. Choose a feeder that’s easy to disassemble for thorough cleaning and inspect it regularly for damage. Replacing broken or worn parts helps prevent the buildup of pathogens. Keeping your feeder clean is essential for maintaining a healthy, thriving flock.