

Building a chicken coop that’s functional and predator-proof doesn’t have to be complicated. A basic setup for six hens needs about 30-40 square feet inside plus a 60-square-foot outdoor run.
With a few simple steps, you can create a cozy, safe space for your flock that fits your budget and time. Keep reading to see how each part comes together.
How Much Space Does Your DIY Chicken Coop Need?
To accommodate six standard hens, you should plan for 30 to 40 square feet of indoor space and 60 square feet of outdoor space. Standard breeds need 3 to 4 square feet inside per bird and 8 to 10 square feet in the run. Proper size ensures chickens have enough room to move comfortably, reduces stress, and helps prevent aggressive behaviors. For the run flooring, using absorbent mulch materials can help control odors and moisture. Supplementing your flock’s diet with black soldier fly larvae can provide a high-protein treat that supports feather growth and overall health during molting.
Ventilation is equally important; aim for 1 square foot of vent opening per 10 square feet of floor space. Good airflow prevents moisture buildup and reduces respiratory issues. Insulation helps retain warmth during winter and prevents drafts. Adequate lighting is essential for egg production in the winter but keep it dim near roosts to minimize stress. Provide one nest box for every 3 to 4 hens and separate nesting areas from roosting zones to avoid overcrowding and territorial disputes. For high-quality enclosed systems, predictable coop layouts often simplify construction and improve long-term durability.

Provides up to 8 hours of reliable illumination after solar charging, offering dependable lighting for homes, emergencies, power outages, and outdoor activities.

CONVENIENT PULL-STRING CONTROL & POWER BOX: Designed with a user-friendly pull string, this solar ceiling fan with light eliminates the frustration of lost remotes. The integrated Power Box features a built-in battery and clear, color-coded LED indicators, making it effortless to monitor your exact working mode and power status at a glance.

FRESH & COOL - This solar panel dual fan kit can exhaust hot air and let cool air into the room, effectively reducing indoor temperature and humidity and keeping the air fresh. It is suitable for small space ventilation and is ideal as a solar fan for small greenhouses, chicken coops, sheds, pet houses, and window exhausts.
Choose the Best DIY Chicken Coop Design for Your Yard
Choosing the best DIY chicken coop design for your yard depends on your space, climate, predator risks, and maintenance preferences. For small or compact yards, an A-frame coop is ideal because it’s simple to build and practical for limited space. If you have a larger yard, a walk-in coop makes daily chores like cleaning and egg collection much easier, offering plenty of room for your flock to move.
In wetter climates, a sloped roof helps shed rain and snow, preventing leaks and keeping your chickens dry. Protect the coop with generous ventilation covered by hardware cloth, which allows fresh air while keeping predators out. Predator-proof latches are essential; opt for locking latches on access doors and nesting boxes. To deter diggers and predators from burrowing underneath, bury hardware cloth a few inches into the ground or add a buried apron around the coop base. You can also save money by using scrap lumber from a previous project to build the frame.
Weatherproof the wood with decorative paint that also provides a layer of protection, extending the life of your coop. Consider adding interior lighting—like solar-powered LEDs—to promote egg production during shorter winter days. Keep your coop’s design simple and accessible, ensuring maintenance is manageable. For those incubating eggs from their flock, using a forced air incubator ensures more consistent temperature and humidity levels for better hatch rates. When you choose what fits your yard and your needs, your flock will thrive, and caring for them will be much easier. For instance, if you reuse plastic egg cartons for organizing small supplies in your coop area, remember that they are not typically recyclable in curbside bins, so check local guidelines before discarding them.
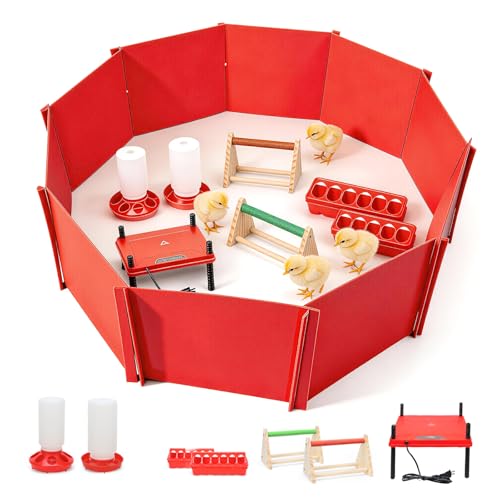
All-in-One Chick Brooder Kit:No more piecing things together!This baby chicken cage includes:a foldable octagonal brooding pen,a chicken feeder and waterer set,2 wooden chick perch,and a chicken heat plate.The moisture-resistant PVC pen keeps out wind,prevents escapes,and protects against predators,making it ideal for chicks,ducklings,quails,and more.From day one at home to the sixth week when they move to the outdoor coop,this all-in-one set covers all your brooding needs

Multi-Directional and Stable: 360-degree swivel casters provide exceptional stability for chicken tractor. The four-corner design of the chicken coop accessories can support a maximum load capacity of 700 lb, ensuring safe transport for chicken house
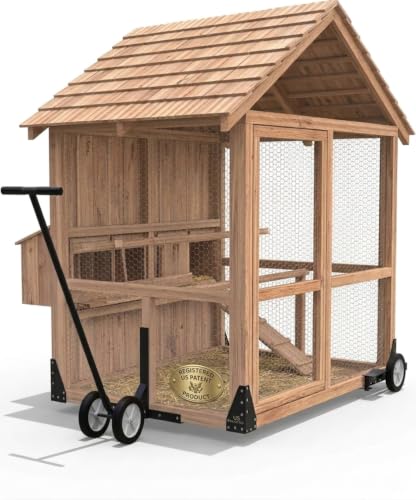
Patented Lever Lift – Lift Front in Seconds: Simply press down the T-handle to raise the front of your chicken coop onto two wheels. The lever mechanism transfers your weight efficiently, letting you lift even a fully loaded coop without straining your back.
The 10 Materials You Need to Build a Sturdy Coop
Using pressure-treated 2x4s for your chicken coop frame, floor joists, and roof supports is essential for durability. These boards effectively resist moisture and rot, extending the life of your structure. For lighter framing and roosting bars, 2x2s are sufficient and easier to handle. When selecting wall and floor sheathing, opt for 1/2-inch exterior-grade plywood; however, upgrade to 3/4-inch pressure-treated plywood for the floor to support weight and prevent warping. Cover the roof with metal panels or asphalt shingles layered over plywood sheathing to ensure weatherproofing. For vents and windows, use 1/2-inch hardware cloth instead of chicken wire to keep predators out. Secure all components with exterior screws, galvanized brackets, and heavy-duty latches for added strength. If you are also hatching chicks, you may want to research a top quail egg incubator to ensure reliable temperature control and humidity. Finish edges with trim boards to give your coop a tidy look. Proper planning of your material storage and tool organization before starting will save you time and avoid frustrations. To set a strong foundation, embed each post in concrete for stability using the same spacing method recommended for metal fence posts. To support egg production once the coop is built, also consider that your flock requires a top layer feed with balanced calcium and protein.

Many Uses - This product is suitable for new home construction, renovation projects, and more and has been tested for many different jobs.

By Crafters, For Crafters: Crafting and building with wood is our number one priority. Bringing you more of the wood craft supplies you love is our job

Protects wood: The end cap covers the end grain of the board, protecting it from splitting, cracking and rotting
Build the DIY Chicken Coop Base and Floor Frame First
Starting with a solid base is essential because the entire coop relies on stability from the ground up. Begin by choosing a flat, level site and clearing the area thoroughly to ensure a stable foundation. Lay pressure-treated skids or runners directly on the ground to lift the floor frame off moisture and prevent rotting. Construct the floor frame as a rectangular shape using rim joists and interior joists spaced 16 inches on center. Before fastening anything, measure the diagonals to confirm the frame is square; this step is crucial to avoid future misalignments. For added convenience, consider installing an automatic chicken coop door to ensure easy access and security for your flock.
For the floor decking, use pressure-treated plywood, making sure all seams land over joists to provide sufficient support and prevent sagging. Securing the deck tightly to the frame adds rigidity and longevity. To improve insulation and keep bedding dry, consider placing rigid foam between the joists before attaching the plywood. This added layer helps maintain warmer, drier conditions inside the coop, extending the lifespan of your build. Remember, the stability and durability of your entire chicken coop depend heavily on building a secure, level, and well-supported foundation from the start. Using railroad ties as foundation supports provides a mobile and durable base that keeps the floor frame off the ground. Adhering to standard spacing rules for the floor joists ensures consistent support and prevents future sagging issues. Checking that the frame is square before fastening prevents misalignment problems just like when repairing fence posts.

【Practical Nest Box】The nest box of chicken coops cages comes with a switchable roof. The wooden rod can support the rppf of the best box, which can provide more...
Frame the Walls, Roof, and Peak
To frame the walls, start by assembling all four walls flat on a level surface. Use 2×4 lumber for framing, spacing each stud 24 inches on center for uniformity. Stagger the front and back wall heights to create the roof slope; make the front wall 6 inches taller than the back wall. Install openings for doors and windows now, while it’s simple to do so. Secure double top plates to lock the corners together before standing the walls upright. This ensures stability and proper alignment as you assemble the structure. For a lean-to design, the wall framing can be built with rectangles on top of each other to simplify construction. It is also wise to treat the bottom plates with a poultry dewormer to protect the wood from pests that might affect bird health. Using durable plastic fence posts for the corner supports can provide a longer-lasting foundation that resists rot. For maintaining proper heat in the chicken coop during cooler months, you may also want to install a ceramic heat emitter paired with a reliable thermostat.

Made from 18 gauge galvanized steel to increase rust and corrosion resistance, creating a stronger, long-lasting joist-to-header connection
By Crafters, For Crafters: Crafting and building with wood is our number one priority. Bringing you more of the wood craft supplies you love is our job

By Crafters, For Crafters: Crafting and building with wood is our number one priority. Bringing you more of the wood craft supplies you love is our job. Please dont hesitate to get in touch
Install Nesting Boxes, Roosts, and a Ramp
Nesting boxes should be placed about 18 to 24 inches off the floor. This height makes them accessible for hens while keeping them lower than the roost bars. Position one box for every 3 to 4 hens, with each box measuring approximately 12x12x12 inches. To discourage hens from roosting on top, add a sloped roof to the nesting box. Proper placement encourages eggs to be laid in the box and reduces stress for the hens. Using coarse sand as bedding inside the boxes can improve drainage and keep eggs clean. For added predator protection, consider using hardware cloth instead of chicken wire when constructing the coop’s exterior. Cracked corn is a popular treat that provides quick energy for chickens during cold months.
Ventilate Your Coop Without the Drafts
Good ventilation is essential for your coop, especially during winter, to remove excess moisture and ammonia without causing drafts. Place vents high near the roof or upper walls so stale air can escape above your chickens. Avoid openings at roost level, as cold air hitting your birds directly can cause stress and health issues. During the cold months, seal the lower vents while keeping the upper ones open, allowing fresh air to enter without creating drafts. Installing a baffle or deflector can help redirect incoming air upward, further reducing drafts. To check for drafts, hold a piece of tissue near the roosting area; if it moves, adjust the vents or baffle until airflow is gentle. Proper ventilation not only improves air quality but also helps keep litter dry, which benefits your watering system and nesting areas by minimizing dampness. Remember, aim for a steady, gentle airflow, not a strong wind. For specific guidance, consult an effective guide to avoid common mistakes. When shopping for materials, consider reviewed top vent options to ensure you choose a durable and efficient design.
Predator-Proof Your Coop With Hardware Cloth
Using 1/2-inch hardware cloth is essential for predator-proofing your coop. This gauge of galvanized mesh is stronger than chicken wire and effectively blocks raccoons, weasels, and snakes. Cover every opening, including windows, vents, and seam junctions, not just the obvious gaps. Secure the cloth with screws and washers instead of staples, as staples can be pried loose by predators. Overlap sheets at seams to prevent gaps and ensure consistent protection. For digging predators, bury the cloth at least 12 inches deep or create an L-shaped apron outward from the base. Regular inspection at night, especially with indoor lighting, helps detect weaknesses. Pair hardware cloth with secure latches on doors to prevent breaches, and treat any opening larger than 1/4 inch as an immediate predator warning.
Add the Door, Windows, and Secure Latches
Proper installation of the door, windows, and secure latches is essential for a safe and functional chicken coop. The main access door should be tall enough to allow you to stand upright during cleaning tasks, typically around 6 feet high, to reduce bending and make maintenance easier. Include a separate pop door at chicken level to allow birds to move freely between the coop and run, which helps reduce stress and prevents crowding. For durable and rust-resistant hardware, consider using zinc-coated steel barrel bolts like those sold in pairs by KDUP Hardware Co., Ltd.
Windows should be positioned high in the walls, approximately 2 to 3 feet above the floor, to facilitate ventilation and reduce moisture buildup while avoiding drafts during cooler weather. Cover all window openings with hardware cloth instead of screens, and ensure they close tightly to keep out rain, predators, and pests. Use strong, rust-resistant latches such as sliding bolts combined with a carabiner or hook-and-eye mechanisms, mounted high on the door to deter ground predators. Always fasten hardware with weatherproof screws to ensure longevity and safety. Properly securing all entry points guarantees a coop that is both safe from predators and comfortable for your flock.
What Your DIY Chicken Coop Will Actually Cost
A small DIY chicken coop for 2–4 hens will typically cost between $200 and $500 if you’re using new lumber and hardware. Material choices and size are the main factors driving the price. Larger coops, such as walk-in models, can range from $700 to $1,500, while custom-built setups may cost over $2,000. Reclaimed pallets can cut costs significantly, bringing the total down to $40–$150, but standard builds with plywood and hardware cloth usually hover around $400.
Pressure-treated lumber can triple expenses, so unless you’re planning for a coop that lasts several decades, softwood remains the more economical option. Don’t overlook hidden costs like sturdy, spill-proof feeders or hardware for features like a droppings board, which can add to your overall budget. Expect to spend approximately 20 to 40 hours on construction work, though building alone saves you hundreds compared to buying preassembled coops. A more premium setup, such as a 24-square-foot coop with an attached run, can reach around $2,565 in total costs.