

Struggling to pull out stubborn fence posts? Whether they’re set in soil or concrete, removing them can seem challenging.
The right techniques can make the job much easier and faster. In this guide, you’ll learn straightforward methods to topple old posts without heavy equipment.
Keep reading to discover how you can get the job done efficiently.
Why Fence Post Removal Is Harder Than You Think: and How to Choose Your Method
Fence posts are often easier to see than to pull out. The reality is, you’re battling against compacted soil, suction, and side friction, not just pulling on wood. Hidden rocks or roots can act as natural anchors, making extraction even more challenging. Your soil conditions play a crucial role; hard-packed clay or rocky ground can turn a straightforward pull into a digging project. Deep-set concrete or broken posts buried six inches underground provide little to grip onto, adding to the difficulty. To achieve lasting results when installing new posts, proper backfilling and tamping techniques prevent these same stubborn conditions from forming later. Using correct spacing between posts, as detailed in a guide for a durable welded wire fence, also ensures long-term stability. While not directly related to fence posts, the same attention to bedding and enclosure conditions helps prevent pest issues in backyard flocks.
These obstacles aren’t always obvious but can dramatically increase resistance. Saturating the ground or excavating around the post can help loosen these anchors. Recognizing how soil type and hidden obstructions affect removal guides you to the right method. Ultimately, it’s not just about pulling a post but extracting a system of soil, concrete, and hidden barriers that have formed a stronghold over time. A car jack method, using a chain and high lift jack to apply controlled upward force, excels precisely in such rocky or broken conditions, often requiring minimal digging.
Start With the Fastest Method: Post Pullers or High-Lift Jacks
Using a post puller or a high-lift jack is the quickest way to start removing a post. For a post puller, place it directly over the post, wrap the chain around it twice, and tighten fully. To ensure proper operation, regularly grease the pins with lithium grease before each use to keep the mechanism moving smoothly. Before pumping, close the pressure release screw. By lifting about 200 millimeters, you can break the ground seal and loosen the post. Regular maintenance of the tool keeps the mechanism operating smoothly, reducing effort during use. For poultry owners, hemp bedding for hens offers a highly absorbent and dust-free alternative that reduces ammonia buildup in coops. This same focus on quality and value applies when selecting a chicken coop with run for your flock.
With a high-lift jack, wrap a steel chain securely around the post and position the jack close to its base. As you lift, do so slowly to avoid sudden shifts. Placing a sturdy board underneath on soft ground helps prevent sinking. Always follow safety precautions: wear appropriate personal protective equipment, keep others clear of the work area, and avoid using the equipment for tasks it isn’t designed for. If the posts are long, cut them down first to reduce the risk of injury during removal.

Powerful and Versatile: The utility farm jack boasts a substantial load-bearing capacity of 7,000 pounds, lifting range: 4.13-40.74 inch/105-1035 mm, making it the perfect solution for various farm work tasks, such as efficiently lifting agricultural machinery vehicles and carrying heavy objects like stumps and fence posts. With 48 inches large lifting space, the farm jack is suitable for a wide range of vehicles, including off-road vehicles, cars, and trucks, and can even be used as a winch.

✓Product Size:5/16" aircraft-grade steel cable ( 24 inches long) with 8,000+ lbs pulling force. 1/4" high-strength chain ( 24 inches long),The unfolded length is 48 inches. The adjustable chain works with standard jacks and 4x4 levers, ideal for removing tilted, snapped, rotten, or partially buried posts.

MAKES POST REMOVAL SIMPLE: Fence post puller tool clears posts without the usual fight. Built for fast, easy use around the home, garden, or farm
Remove a Concrete-Set Post With a Jack and Chain
To remove a fence post set in concrete, you need a heavy-duty chain and a high-lift jack. Start by exposing a small section of the concrete footing—dig just enough so the chain can grip securely. If the soil is hard, use a digging bar to loosen and clear the area. Wrap the chain tightly around the lowest exposed part of the concrete. Use a grab hook to cinch the chain, which helps stabilize the post and prevents slippage during removal. Position the jack on a sturdy base, such as thick plywood, and place it close to the post for a straight, controlled pull. For a more secure hold, refer to the proper chain and grab hook techniques used when installing t post clips. Hook the chain to the jack’s lifting point and slowly pump the jack. Apply steady pressure until the concrete footing breaks free. During the process, keep your hands clear, wear gloves for safety, and lower the jack slowly once the post is removed. Afterward, fill the hole with soil or gravel to restore the ground. This lift action method pulls the post upward with minimal digging, even when the concrete is loose or broken. Keeping chickens entertained with coop toys can also require similarly steady effort and proper equipment to ensure a secure setup. For removing a concrete post, selecting incubator quality equipment ensures reliable performance and prevents failure under heavy strain.

Crafted from heavy-duty PVC and Oxford cloth, this RV trailer jack cover offers exceptional waterproof protection for electric jacks.
【 Premium Full Grain Leather Construction】Crafted from genuine full-grain cowhide, our keychain features a natural, textured finish that ages beautifully with use. Unlike faux leather or low-quality alternatives, this thick, durable leather resists tearing and stretching, ensuring long-lasting daily use while developing a unique patina over time.

Heavy - Duty Aluminum & Rust - Proof: Crafted from high - quality aluminum, this trailer chain holder is built to last and resist rust, ensuring long - term durability in various weather conditions.
Lift Out a Stubborn Post With a Lever Board and Block
For a stubborn post that won’t move, especially one set directly in soil without concrete, using a lever board and block can be very effective. Start with a long, stiff 2×4 or 2×6 board to serve as your lever arm. Place a solid fulcrum block, such as a cinder block or 4×4, close to the post but clear of the hole to give the best leverage. If the post doesn’t have a natural lip, attach a short 2×4 cleat low on the post with screws to create a secure catch point. Soaking the post with water for 5 minutes before levering loosens soil to reduce resistance. This method works best on straight run chickens, which are unsexed day-old chicks that may be male or female. Using a pulling chain around the post base can provide a secure attachment point for the lever. For an optimal setup, consider using PVC pipe feeders that provide consistent, waste-free feeding.
Press down steadily on the long end of the board, stepping instead of jerking, to gradually lift the post. Ensure the fulcrum remains stable throughout the process. Always wear eye and hand protection, and avoid overloading the board beyond its strength, as it could snap. Practice patience, taking small, steady efforts to free the post without risking damage or injury.

Effortless Post Extraction in Minutes: Fence post remover helps you say goodbye to back strain. Galvanized cable loops securely around 4x4 fence posts, including broken or rotted ones, while the 1/4" chain connects to any jack or lever. Simply tighten and lift with no digging or hammering required, suitable for concrete-set posts and DIYers of all skill levels

T Post Puller Fence Post Puller Heavy Duty Fence Post Puller with 47" Lifting Chain & T Post Puller Plate

【Superior Rust-Free 304 Stainless Steel – Outlasts Galvanized 】This Upgraded Fence Post Remover features a thick stainless-steel cable & 304 steel chain that far surpasses galvanized parts in corrosion resistance. The ultimate heavy-duty fence post removal tool for lasting farm repair and DIY performance.
Dig and Loosen the Post When You Have No Special Tools
To loosen a post without special tools, start by rocking it side to side. Even small movements help widen the gap between the post and the ground or any surrounding material, which weakens the suction that’s holding it in place. Continue this soak-and-rock cycle, applying water or a lubricant to ease looseness, until the post feels loose enough to move freely. Using a heavy sledgehammer to strike the post sideways can also help break the concrete bond and speed up the process. Use a long 2-by-4 as a lever, placing a block underneath as a fulcrum near the post for maximum lifting power. Press down on the far end of the 2-by-4 to tip it upward and lift the post. Repeating this leverage move alongside rocking can gradually loosen stubborn posts without damaging them. For improved efficiency, wrap a ratchet strap around the post and 2×4 to generate upward force without extra digging. For extra leverage, consider using a DIY chicken saddle approach to pad the strap contact point and prevent damage. Chickens do not require oyster shell for this task, but it is a key supplement for their calcium needs. This approach works well even without powered tools and allows you to remove the post in manageable stages.

Heavy-Duty Support: Our house floor jack is built from tough Q235 steel. Each jack handles up to 24700 lbs/11203.73 kg with ease—perfect for heavy lifting.

【Fast & Effortless Extraction】Our galvanized cable securely loops around 4x4 fence posts—even broken, rotted, or concrete-set ones—while the ¼" heavy-duty chain connects easily to your farm jack, lever, or truck. Just tighten and lift to remove posts, stumps, or small trees in minutes, with no digging or hammering required. Ideal for DIYers, farmers, and landscapers of all skill levels.
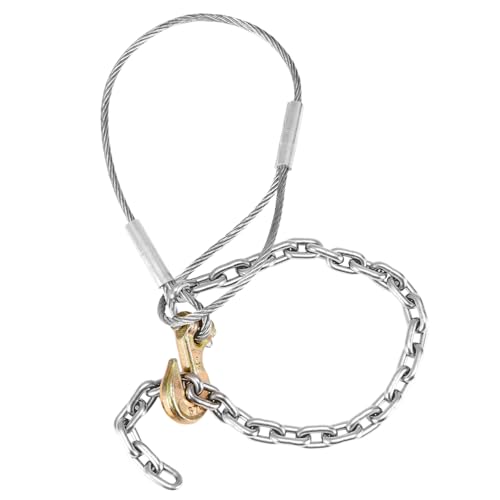
Efficient Fence Post Removal - This fence post puller remover tool is designed to easily remove 4x4 wood fence posts using a post remover jack.
How to Fill the Hole and Dispose of Concrete Debris
After removing the old post, you’ll need to fill the hole and manage any remaining concrete debris. Start by breaking the concrete footing into smaller chunks to make handling easier. Separate the concrete from any wood or metal to keep it clean for recycling. Fill the hole gradually with layers of clean soil or gravel, tamping each layer firmly to ensure proper soil stabilization. Mixing soil and gravel can improve drainage and create a more stable backfill. Add the fill in stages to prevent large voids and reduce the risk of future settling. For an efficient approach, you can adapt principles from DIY PVC chicken waterer construction to build a simple tamping tool from scrap materials.
For debris disposal, use a tarp or wheelbarrow to control spillage during hauling. Avoid burying large pieces, as they can impede drainage and cause problems later. Many local facilities accept clean concrete for recycling—check your disposal site beforehand. Finish by raking the surface smooth and compacting the top layer to eliminate trip hazards and create a level surface suitable for further landscaping or construction.