

Struggling with keeping turkey feed dry and reducing waste? Building your own gravity-fed feeder from simple materials like PVC pipe might be just what you need. It’s affordable, straightforward, and easy to customize as your birds grow.
By the end of this guide, you’ll know how to make a durable, weatherproof turkey feeder that keeps feed fresh and minimizes mess.
Let’s walk through the steps to get you started.
Why 4-Inch PVC Pipe Keeps Feed Dry and Dispenses Evenly
A 4-inch PVC pipe strikes a practical balance between capacity and control, making it ideal for keeping your turkey feed dry and dispensing it evenly. This diameter offers enough volume to minimize how often you need to refill, yet it remains manageable in size. The vertical, enclosed chamber and sealed top cap effectively shield the feed from rain and humidity, helping dry feed stay preserved longer, even in backyard setups. To further protect the feed from moisture, you can add a small drainage hole in the bottom cap.
The pipe’s geometry ensures reliable flow of pellets and crumbles, preventing common issues like bridging or clogging. Gravity facilitates smooth movement, allowing feed to replenish the access point as your turkeys eat without requiring frequent shaking or manual redistribution. The 4-inch size provides a stable feed column, reducing uneven dispensing and bottlenecks often seen with narrower tubes.
Additionally, this size is widely available and compatible with standard fittings, simplifying your build and ensuring it functions efficiently over time. Its design combines practicality with durability, making it a solid choice for keeping feed dry and dispensing evenly. With reinforced joints using straps and sheet metal screws, the assembly’s sturdiness is greatly enhanced for long-term outdoor use.

Waste Free Pvc Chicken Feeder: The wall-mounted chicken feeder, chicken feeder, enables continuous feeding for chickens, minimizing feed waste and reducing rearing costs. Please note: This PVC chicken feeder is 19.3 inches long, 6.7 inches wide, and has an inner tube diameter of 3.8 inches.
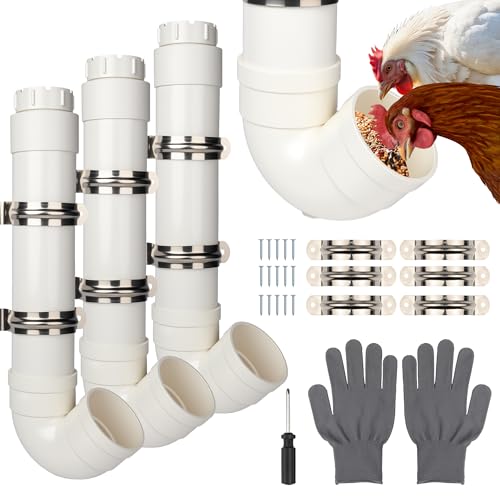
Waste Free PVC Chicken Feeder: This wall mounted chicken feeder provides a continuous supply of feed to chickens, minimizing feed waste and thereby reducing feeding costs. Please note: This PVC chicken feeder is 19.3 inches long, 6.7 inches wide, and has an inner tube diameter of 3.8 inches.

🐓【Automatic Chicken Feeder】Our Chicken Feeder Is Mounted On The Wall, Allowing Chickens To Access Food By Simply Sticking Their Heads In. This Design Prevents Chickens From Standing On And Scattering The Feed, Significantly Reducing Food Waste And Lowering Feed Costs.
Drill Feeding Holes in Your DIY Turkey Feeder for Controlled Flow
To drill feeding holes in your DIY turkey feeder effectively, start with a hole diameter of 3/16 inch. This size controls the feed flow for adult turkeys, preventing spills and discouraging birds from climbing into the tube. Match the hole size to your feed type; pellets and crumbles pass through differently, so choose accordingly to ensure consistent dispensing without waste. For precise control, consider using a diatomaceous earth spreader to uniformly apply powder for parasite prevention in your flock. A chicken coop with a roosting bar is also essential for keeping turkeys comfortable and dry during rest.
Next, focus on hole placement. Drill the openings on the lower side of the pipe, about 5 to 6 centimeters from the bottom. This positioning leverages gravity to direct feed toward the ports. Space the holes 2 to 3 inches apart for shorter, more compact feeders, or 6 to 12 inches apart for longer tubes to prevent crowding.
Use a step drill or hole saw to make clean cuts, then smooth the edges with a file to prevent snags. Once you’ve drilled and smoothed the holes, test the feeder with feed inside. Observe the flow and adjust if needed to ensure the feed moves freely without clogging or spilling.
Screw-On Cap or Simple End Cap: Which Works Better for Refills?
A screw-on cap is the better option for refills because it offers greater convenience and durability. You can twist it off easily to refill your feeder without prying or damaging the cap. This type of cap tends to hold up better over repeated openings, staying secure against weather exposure and contact from animals. In contrast, simple end caps are quicker and cheaper to install initially, but they tend to loosen over time with frequent use, making refilling more difficult and less secure. When choosing a feeder for your flock, consider that top chicken coops for 12 hens often feature durable components to withstand frequent use. For optimal egg production, chickens require complete layer feed that provides balanced calcium and protein. While simple caps may save you money upfront, the screw-on design often proves more cost-effective in the long run due to its reliability. It also spares you frustration from struggling with stuck or loose caps, saving time and effort during each refill. If you plan to refill your feeder often, investing in a screw-on cap is advisable because its sturdiness and ease of use make the process smoother and more dependable. Monitoring the temperature of your feeder setup is also important, as a reliable incubator thermometer can help maintain optimal conditions for feed storage.

HIGHLY DURABLE - This water tank base is made of heavy-duty polystyrene that is designed to withstand heat, cold, and cracks.

Prevents chickens from kicking feed out of PVC feeders, helping reduce waste and keeping the ground cleaner.

HIGHLY DURABLE - This water tank base is made of heavy-duty polystyrene that is designed to withstand heat, cold, and cracks.
Seal Your Feeder Against Rain and Moisture
Sealing your feeder against rain and moisture is essential to keep the feed dry and prevent damage. Start by thoroughly cleaning every seam to remove dirt and grime, as these weaken the adhesion of the sealant. Once cleaned and dried, apply a flexible silicone sealant evenly along all joints, ensuring there are no gaps or bubbles that could allow moisture to penetrate. Using a weather-rated outdoor formula enhances durability through temperature fluctuations and wet conditions. Allow the sealant to cure fully before adding feed to ensure a strong, waterproof barrier. Opt for Schedule 40 PVC pipes, as they offer superior durability compared to thin-walled options that can crack or warp. Connect pieces with PVC cement, which chemically welds joints for a tight seal. Adding a sloped roof with overhangs helps shed rain and minimizes splashback on the feed. Incorporate drainage holes at the base to prevent trapped condensation from spoiling the feed. Elevating the feeder above damp ground prevents wicking and moisture absorption. Additionally, using crushed oyster shells as a grit source can help your turkeys digest feed more efficiently when stored in the sealed feeder. Regularly check seams and reapply sealant after storms to maintain protection. Selecting a design with a high quality run can also protect the feeder area from moisture tracked in by birds. Oyster shells also serve as a cost-effective calcium supplement for laying hens when added to a sealed feeder.

100% Waterproof and Weatherproof: 100% silicone formula offers protection against water damage, providing a reliable seal in areas prone to harsh weather

100% Waterproof: This 100% silicone formula offers ultimate protection against water damage, providing a reliable seal in areas prone to consistent water exposure

100% all purpose waterproof sealant is rain and water ready in 30 minutes
Mount Your PVC Turkey Feeder at the Right Height
Mount your PVC turkey feeder at the appropriate height to match your birds’ growth. As they mature, regularly raise the feeder to align with their back height, which prevents them from stooping or stretching excessively. A feeder set too low causes them to crouch, leading to scratching at the feed and unnecessary waste. Conversely, a height that’s too high strains their necks and reduces their feed intake. You can apply cost-saving strategies from DIY oyster shell projects by using similar materials like PVC pipes and fittings. For example, reusing metal shed components from an old structure can provide durable, low-cost materials for your feeder. Building your own chicken tractor allows you to construct a portable enclosure from similar low-cost materials. Adjust the mounting consistently to ensure the feed remains accessible without forcing crouching or stretching. This ongoing process supports cleaner access, minimizes contamination, and encourages efficient feeding throughout the rearing period.
Adjust Feed Flow to Stop Waste in Your Gravity Tube
Adjusting the feed flow is essential to prevent waste in your gravity tube. To do this, keep the feed chamber below the port line, setting the standing feed level just beneath the bottom edge of the access ports. Since gravity refills only as birds eat, this prevents overfilling and reduces spillage when birds bump the tube aggressively. Use narrower, controlled openings that allow the bird to admit the head but stop full beak raking, minimizing unnecessary waste. Shaping the outlet with V-shaped or funnel-style designs helps resist waste behavior by directing feed downward and away from the floor. Recessed troughs can catch loosened feed before it hits the ground, further reducing spillage. Match the feed rate to demand, replenishing only what was eaten instead of flooding the port. Excessive flow leads to pooling and waste, so maintaining a steady, controlled flow supports spill prevention and cleaner access. Keep the feeder level to avoid uneven pooling and use a lid to keep feed dry. Dry feed flows more consistently, reducing clumping and waste. Building your own feeder with simple materials can also cut costs, as a DIY approach lets you customize these flow-control features without buying expensive commercial parts. Proper ventilation in the feed storage area also prevents moisture buildup that causes clumping and spoilage.
Maintain Your Turkey Feeder With Routine Clean-Dry Checks
Regular cleaning is essential to prevent mold growth and maintain your turkey feeder’s hygiene. For outdoor or moisture-prone feeders, aim to clean at least once a week; for feeders less exposed to moisture, monthly cleaning is sufficient. If you notice residue, dust buildup, or damp feed, increase cleaning frequency accordingly. Your feeder’s design determines how easily you can disassemble it; follow the manufacturer’s instructions to detach parts properly. Wash all components with soapy water, then rinse them thoroughly with a bleach solution to kill spores. Ensure each piece is completely dry before reassembling, and sitting them in direct sunlight speeds up drying and mold prevention. Do not refill the feeder until every seam and joint is entirely dry. During each cleaning, inspect for mold, clumping, or damp feed. Remove any fallen seed and debris from beneath the feeder as well. Keeping your equipment clean and dry slows spoilage and helps keep your turkeys healthy. For a more durable option, consider using water cups for chickens since they minimize spillage and moisture exposure. For Brahma chickens, a spacious coop design with proper ventilation is also critical to prevent moisture buildup and mold.