

Are pests taking over your home or garden and you’re wondering how to get rid of them safely? Using food-grade diatomaceous earth is a natural, effective option. Its fine, powdery texture works by damaging pests’ exoskeletons, helping you control unwanted critters without harsh chemicals.
Here’s how to apply it properly for the best results.
Start With Food-Grade Diatomaceous Earth
Start with food-grade diatomaceous earth (DE) to ensure safety and effectiveness. Always verify that the DE is labeled “food-grade,” especially before using it around food or animals. Check the crystalline silica content—aim for less than 1%—to reduce health risks. Although this purified form is listed as Generally Recognized As Safe (GRAS) by the FDA, it should still be handled with caution, not ingested casually. Choose a product that is OMRI Listed for organic use, ensuring it contains no additives or fillers and is rich in amorphous silica for soil health. For lasting pest control, consider pairing your DE with a chicken coop with run that keeps bedding dry and well-ventilated.
Store your DE properly by keeping it in a sealed, dry container away from moisture. Moisture can impair its absorbent properties and reduce effectiveness. When using DE, always wear a mask to prevent inhaling the fine dust, which can irritate your respiratory system. Minimize dust exposure by applying a thin layer rather than heavy dusting—more isn’t necessarily better. These precautions help ensure safe, effective pest control without compromising your health.

100% Chemical-Free: Made from 5lbs of food-grade freshwater diatomaceous earth with no additives or fillers. Safe for use around children and pets when used as directed.

✅ OMRI Listed for Organic Use – Certified by the Organic Materials Review Institute, ensuring compliance with strict organic standards for safe gardening and farming.

100% Chemical-Free: Made from 8oz of food-grade freshwater diatomaceous earth with no additives or fillers. Safe for use around children, pets and farm animals when used as directed.
Prep Your Area for Dry Application
To properly prepare your area for dry application of diatomaceous earth, start by thoroughly cleaning the surface. Vacuum carpets and edges to remove crumbs, dust, and debris that could cause surface contamination. Wipe down hard surfaces to ensure the powder can reach target zones without obstruction. Empty cabinets and enclosed spaces, removing old residues that might prevent adhesion. Focus on pest travel routes such as baseboards, corners, and beneath appliances.
Next, dry out the treatment area completely. Fix any leaks with caulk or sealant before dusting, as wet surfaces will render the powder inactive until they dry. Allow cleaned surfaces to dry fully after wiping.
Then, inspect cracks and crevices for pest activity. Check behind appliances like refrigerators and stoves, as well as inside cabinets. Pay attention to areas where pests are likely to travel, such as wall-floor junctions and hidden gaps. For a chicken coop, consider that agricultural lime is a popular alternative for moisture and odor control in the bedding. Limit movement in the zone to prevent disturbing the area and keep family members out during treatment. Remove items blocking access to edges and corners. Apply the powder only on surfaces where pests can come into direct contact and test small spots first to prevent staining. For a larger area like a chicken coop, you should also remove soiled bedding and sweep the floor to ensure the powder reaches target zones without obstruction.
Apply Diatomaceous Earth in a Thin Layer
Apply diatomaceous earth in a thin, even layer—about 0.5 to 1 gram per square foot. This creates a nearly invisible dusting that pests must walk through to pick it up. Use a fine sieve or hand duster to distribute a faint haze evenly across cracks, baseboards, and entry points. Avoid clumping or piling the powder, as pests can easily bypass heavy deposits. Instead, focus on spreading a delicate, lightweight coating that covers all targeted areas without visible buildup. Remember, over-application wastes product and reduces effectiveness. A gentle puff of powder is sufficient; just refresh areas as needed without adding extra layers. This approach avoids the overfeeding risks seen when feeding scratch grains to quail, where heavy deposits can be harmful. Using a light dusting helps ensure that pests cannot avoid the treated surfaces, similar to how a DIY chick waterer relies on precise placement to keep chicks from bypassing the water. For best results, choose a product like cracked corn for chickens that is finely ground to improve dust distribution and pest contact.

Detachable Bulb Duster: this handheld powder duster features a removable rubber bulb and angled dispensing tube for applying diatomaceous earth, DE powder, and other fine powders; Squeeze the bulb to direct powder into corners, gaps, and targeted areas

POWERFUL CRAWLING INSECT KILLER : Effectively kills a wide range of crawling insects including ants, bed bugs, cockroaches, fleas, earwigs, silverfish, and spiders. A natural solution for indoor and outdoor pest control without harsh chemicals.

Evenly Dusting: Evenly and effectively spread diatomaceous earth on the flat surface, so that the diatomaceous earth powder is evenly distributed in the target area, to ensure that every place can be covered by the powder, so that the insecticide is fully exposed to the pests, improve the killing rate, so as to improve the insecticidal effect
Use a Wet Spray When Dry Won’t Work
Using a wet spray with diatomaceous earth is effective when dry application won’t work. To do this, mix about 4 tablespoons of DE per gallon of water. Since DE doesn’t dissolve, you need to shake or stir it constantly to keep it suspended. Apply the slurry with a garden sprayer, spraying in a light, even coat to prevent runoff. This method also helps you minimize airborne dust during application. For ducklings, keeping the brooder environment dry and well-ventilated is key to avoiding respiratory irritation, so this wet application is a safer alternative in such enclosed spaces. Building a DIY fence wire tensioner uses similar principles of controlled tension and even distribution to secure materials effectively.
Timing is crucial because the slurry only kills pests after it dries completely. For best results, spray during warm, dry weather. Once dry, the DE will form a thin, dust-like layer that clearly shows where you’ve sprayed. Use a nozzle set to spray to reach concealed areas and ensure even coverage. This method minimizes airborne dust and effectively penetrates tight or hard-to-reach spots.

【Effortless Pump System】Replace traditional bulb dusters with a pump dust applicator that delivers continuous airflow using significantly less grip force. This efficient powder applicator and dust applicator reduces hand fatigue making this pump sprayer, plant duster, and garden duster ideal for extended indoor and outdoor powder applications such as gardens, warehouses, chicken coops, and outdoor treatment areas.

Light Dusting: Spreads diatomaceous earth evenly and efficiently on flat surfaces
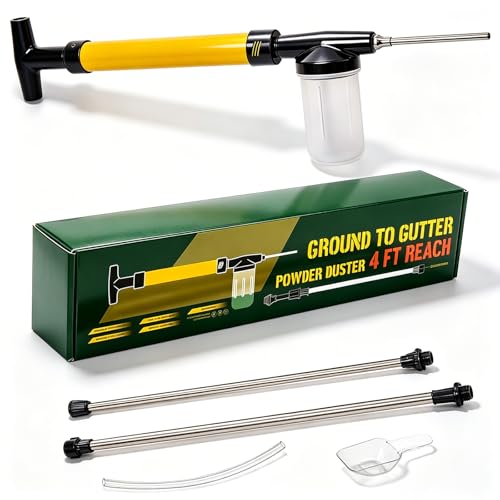
✅Clog-Free Air Pump Powder Duster: Upgraded airflow avoids clogging for smooth diatomaceous earth fine powder output, less hand fatigue vs bulb sprayers
Reapply Diatomaceous Earth After Rain or Cleaning
After rain or cleaning, you need to reapply diatomaceous earth only once the treated surface is completely dry. Heavy rainfall can wash away the powder, and indoor humidity can cause clumping or caking, reducing its effectiveness. When you vacuum, mop, or wipe the surface, the powder is removed, so reapply if pest pressure persists. Don’t coat untouched areas—only refresh sections where the barrier has been visibly disturbed. Check for missing coverage along pest travel routes, edges, and corners to ensure continuous protection. Outdoors, reapply after every rain or watering, as the barrier is more likely to be disturbed. For quail keepers, a top egg incubator can maintain optimal humidity levels that complement your pest control efforts. Indoors, manage humidity levels and reapply after any damp cleaning. A fresh, dry layer ensures you maintain a strong pest barrier. For those storing feed, building a DIY feed bin can help keep the area dry and reduce the need for frequent reapplications. If you rely on a heat bulb in the coop during colder months, its warmth can also help accelerate drying of damp surfaces, so time your reapplication after the bulb has been running.
Leave Diatomaceous Earth in Place for 48–72 Hours
Leaving diatomaceous earth in place for 48 to 72 hours ensures it effectively kills crawling pests. This contact period allows the dust to abrade the pests’ waxy cuticles and dehydrate them through continuous contact. Because DE works mechanically rather than chemically, pests must cross through the dust for it to be effective. Maintaining a thin, even layer of dust maximizes contact and prevents pests from avoiding the treatment. For optimal results, maintain dry conditions as a solar heater for chicken coop can help keep the environment warm and dry, preventing moisture from reducing DE’s effectiveness. Environmental conditions significantly influence the dust’s effectiveness. Dry, warm weather speeds up pest mortality, while moisture can halt the process. Disturbing or vacuuming the treated areas before the period ends can dismantle the dust barrier and reduce its efficacy. Using a feeder with quality and performance comparable to top chick feeders ensures the dust is not contaminated by spilled feed. Leaving the diatomaceous earth undisturbed during this 48-72 hour window gives crawling pests ample opportunity to cross treated surfaces, ensuring the dust has enough time to work. For poultry owners, similar to how cracked corn can be part of a balanced diet when offered in moderation, diatomaceous earth must be applied in thin, even layers to avoid waste and ensure pest control effectiveness.
Protect Your Family and Pets During Application
To protect your family and pets during application, it’s essential to follow safety precautions. First, move all pets and children out of the treated room and seal the product container tightly to prevent accidental spills or exposure. Avoid applying diatomaceous earth in active play areas, nurseries, or crawling zones where children commonly spend time. Use only food-grade DE—never pool-grade—to ensure safety around pets. For monitoring chick comfort, consider using a reliable brooder thermometer to maintain proper heat levels during treatment. Oyster shells also provide essential calcium carbonate for laying hens to improve eggshell strength. Providing a well-chosen chicken roost ensures hens have a comfortable and elevated resting spot away from treated surfaces.
Apply a very light dusting of the powder to cracks, baseboards, and other hidden areas, avoiding open surfaces or food preparation spots. Wear a dust mask, gloves, and protective eyewear to reduce inhalation and skin contact. Keep the powder away from pet bowls, bedding, and areas designated for food or water.
If you have young or sensitive animals, such as puppies under 12 weeks or pets with respiratory issues, it’s best to avoid treatment nearby. After applying the powder, wait about 30 to 60 minutes for the dust to settle. Then, vacuum any visible residue thoroughly. Wash your hands and allow the air to circulate before re-entering the space.