

Wondering how far apart to place your chain link fence posts for a sturdy, straight fence? Typically, posts are spaced 8 to 10 feet apart.
Residential setups tend to lean toward 10 feet to save money. For areas with high wind or heavy loads, closer spacing of around 8 feet helps prevent leaning or sagging.
Proper spacing is key to a durable fence, but getting it right takes more than just measuring.
What’s the Standard Spacing for a Chain Link Fence?
The standard spacing for a chain link fence is typically 8 to 10 feet on center, depending on the application. For residential projects, 10 feet on center is common, with many guides considering this the maximum spacing to ensure stability. Commercial and industrial fences often tighten the spacing to 8 feet on center to withstand heavier use and provide better durability. When measuring, you count from center to center, dividing the total length into equal segments to avoid uneven gaps. A consistent layout helps create a uniform, professional appearance and maintains proper tension across the fence. While the usual maximum spacing does not usually exceed 10 feet, always adjust your measurements based on your total fence length, consulting a spacing chart to keep tension even and performance optimal. For a similar DIY approach, you can apply cost-saving PVC assembly techniques to your fence project. Ensuring your fence posts are set at a proper depth is crucial for preventing leaning or shifting over time. Using absorbent wood shavings in a chicken run floor can help control odors and moisture effectively.

【GATE LATCH & HINGE KIT】Chain link gate latch suits for connecting 1-3/8" OD frame to 2-3/8" OD post. Male Gate hinge suits for 2-3/8" OD post. Female Gate hinge suits for 1-3/8" OD frame.

Cost Effective Pack Value: this rail end component set comes in a convenient 5 pack, providing ample hardware for multiple post installations and routine maintenance; Stocking these components ensures you can complete large projects or emergency repairs without downtime or additional orders, saving on unit costs
How Height and Wind Load Affect Chain Link Post Spacing
Taller fences require closer post spacing to ensure stability under wind load. As the height of your fence increases, it catches more wind, which places greater stress on each post. To prevent excessive deflection or failure, you should reduce the maximum spacing between posts accordingly. Wind-load tables help determine the appropriate spacing by considering the fence height and site exposure, then applying correction factors for fabric variations like privacy slats or small mesh. For instance, if you install privacy slats or a 1-inch mesh at 8 feet high, you’ll need to tighten the spacing. Heights over 12 feet always demand a detailed wind-load force analysis to prevent structural issues. By decreasing post spacing from wider distances such as 10 feet, you transfer less wind force to each post and footing, which improves overall stability. For taller, windier fences, pair closer spacing with heavier line posts and stronger terminal posts rather than relying on spacing alone. A well-designed coop with run structure also requires properly spaced support posts to maintain stability under load. Furthermore, once the correct spacing and posts are selected, applying a proper bracing technique to the terminal posts ensures they can withstand the increased tension from the fence fabric. Using barn lime in the coop floor helps absorb moisture and reduce odors, complementing the structural stability of the run.

Strength 198 Lbs. Temperature -170℉ To +1000℉, High-temperature Applications Such As Cv Boot Clamps, Tie Rod Boot Clamps, And Heat Wrap For Exhaust Pipes. Uv Resistant For Outdoor Pvc Pipes And Metal Pipes, Pipe Straps.

【Heavy-duty construction】- The 2-3/8" Tension Band for Chain Link Fence is built to withstand heavy pressure and provide a secure attachment for chain link fence rails, gate posts, corner posts, and end posts. Made of high-quality hot-dipped galvanized steel, these tension bands are extremely durable and resistant to rust, ensuring long-lasting performance.
![Pressed Steel Chain Link Fence Post Hinge w/Bolt 3" [2 7/8" OD] x 5/8" | Heavy Duty Hinges | (Pack of 2)](https://m.media-amazon.com/images/I/41t-UVxX-4L._SL500_.jpg)
Fits chain link gate frame size 3" ( 2 7/8")
Residential vs. Commercial Fences: When 8 Feet Beats 10
8-foot post spacing is generally better for commercial fences, especially when taller or more durable fencing is required. This tighter spacing provides greater stability, reduces sagging, and enhances overall strength for high-traffic or perimeter security needs. Heavier commercial fencing often pairs 8-foot post centers with larger diameter posts to ensure long-term durability. While 10-foot spacing can lower material costs and save time for simpler residential projects, it sacrifices some structural integrity. Aesthetically, 8-foot spacing creates a cleaner, more uniform appearance under tension, which is why institutional or high-security fences tend to favor it. When durability and security outweigh the desire to minimize upfront costs, 8-foot spacing is the preferred choice. For those seeking a high-quality egg holder for countertop, similar principles of balance and stability apply to kitchen organization. Many buyers find that a top-rated walk-in chicken coop with run applies these same notions of structural integrity and spacing for poultry housing. Just as visual cues help identify oyster shell styles, paying attention to post spacing details ensures the best fence performance.

Durable and Sturdy: 4 sign posts are made from high-quality galvanized steel Q235 castings, ensuring high strength and durability. They are treated with corrosion-resistant coating to prevent rusting of the fence posts. The green coating provides a natural appearance, blending harmoniously with the environment for an overall aesthetic and coordinated look.

【Inground Installation for Maximum Stability】Designed for maximum stability, this post inserts securely into the ground for a sturdy, wobble-free fit. Combined with thick aluminum walls and tight board channels, even in high-wind zones or uneven ground, it's the ideal choice for anyone looking to build a secure, long-lasting privacy fence (Complete your fence system with matching components—search ASIN: B0GY93FHXL for Aluminum Fence Boards or ASIN: B0F326ZPF8 for Fence Post Spacers)
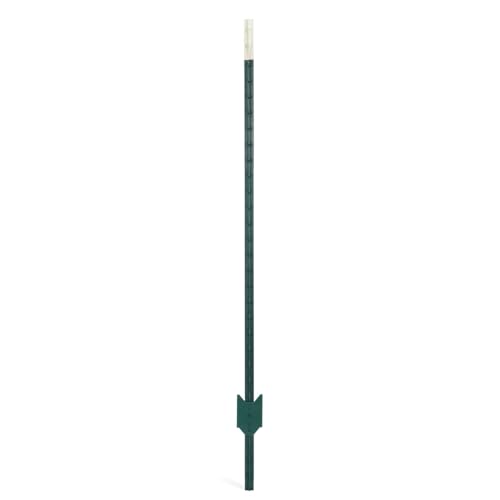
Package Including: Contains one 7FT steel T-post designed for strong ground support; 1.26FT of the post is set into the soil for added stability; rust resistant coating extends outdoor service life; practical for farm, yard, and garden fencing
Corner Posts, Gates, and How They Change Chain Link Spacing
Corner posts and gate posts serve as terminal posts and do not follow the standard spacing rules for line posts. You install them first because they absorb force from two fence runs. Their placement depends on the change in the fence run’s direction, not a fixed interval. Adding decorative post caps will not affect the layout of your fence run. You can apply a similar self-built approach by using affordable DIY materials for custom window frames in a chicken coop. For optimal flock health, you can also provide crushed oyster shells as a free-choice calcium supplement to support strong eggshell production. Gate posts are also different from line posts. You measure the gate opening from the inside face of each terminal post, including a hardware allowance. The spacing is fixed by your gate’s width, not by the usual line post spacing rules. Always confirm that your fencing materials and hardware can handle the load applied to gate posts. When planning your entire run, remember that galvanized wire is standard for outdoor durability and rust resistance. Install these posts before measuring your line runs, which ensures your final bays stay equal and no short sections are needed.
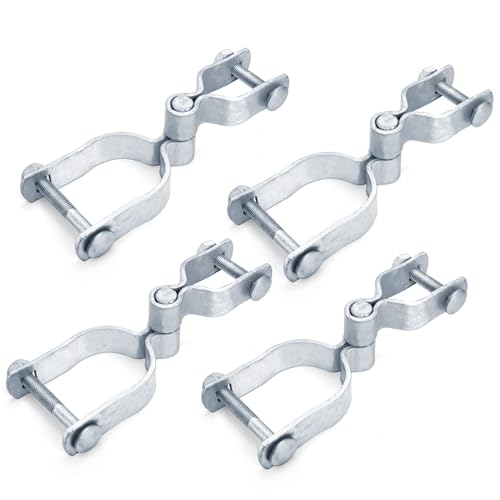
Package Includes: Including 4 pack 1-3/8" female gate hinge (for chain link gate frame size 1-3/8"), 4 pack 2-3/8" male gate hinge (for chain link gate post size 2-3/8"), nuts and bolts are included.

Premium Rust Resistant Material: These chain link fence parts are crafted from high-quality galvanized steel with zinc coating. The durable anti-corrosion structure boosts the service life of your chain link gate and delivers steady performance for long-term outdoor use

Gate hinges are made of anti- rusting galvanized steel with zinc powder, long lasting ensured
How to Space Chain Link Fence Posts Evenly on a Run
To space chain link fence posts evenly on a run, start by measuring the total straight distance from terminal post to terminal post. Divide that length by your target bay width, which is usually between 8 and 10 feet on center. This calculation gives you the approximate number of bays needed. To avoid short leftover sections, round the number of bays to a whole number and recalculate the actual spacing for uniform bays. Always base your measurements on the on-center spacing, which is the distance from the center of one post to the center of the next. If your coop has a chicken run, consider that a sweet heater can help maintain warmth for your birds during colder months. When removing old posts, efficient extraction techniques can save considerable effort, especially if they are set in concrete. To secure your posts and fabric properly, you will need t post clips for attaching the mesh.
Mark all post centers along the line before digging. Verify that the final bay matches the others in length to maintain a consistent look. The height of the posts does not influence the spacing, but maintaining uniform bay widths helps distribute tensions evenly across the fence. Prepare your soil by clearing the path along your marked line and double-checking all measurements. Make slight adjustments if necessary to ensure a balanced run, as a correctly spaced and aligned fence is easier to install and looks more professional.
Do not set the concrete for the posts until you have confirmed every interval is correct throughout the entire length of the run. This step helps prevent costly corrections later and ensures your fence remains straight and sturdy.

【Upgrade Chain Link Fence Ties Kits】100 pieces 1-7/8" Twist Fence Ties Preformed 11 Gauge Galvanized Steel, sufficient of handling multiple fencing and construction projects simultaneously without requiring additional purchases, meeting your daily usage and replacement needs. Our drill chuck tools are designed for enhanced compatibility, enabling more effortless and efficient operation. Accelerate installation and save labor on large-scale projects like farms, Livestock Fencing, and more.

Twist Fence Ties Kits: the package includes 200 pieces black twist fence ties and 1 piece drill chuck, enough to handle large scale installations and detailed DIY fencing projects without the need for additional purchases, satisfying your daily usage and replacement needs

【Upgrade Chain Link Fence Ties Kits】400 pieces 1-7/8" Twist Fence Ties Preformed 11 Gauge Galvanized Steel, sufficient of handling multiple fencing and construction projects simultaneously without requiring additional purchases, meeting your daily usage and replacement needs. Our drill chuck tools are designed for enhanced compatibility, enabling more effortless and efficient operation. Accelerate installation and save labor on large-scale projects like farms, Livestock Fencing, and more.
Why Codes and Manufacturers Limit Spacing to 10 Feet
Codes and manufacturers limit spacing to 10 feet because standard fencing materials are designed to fit this span without additional support or custom cuts. Staying within this limit helps prevent structural issues, code violations, and warranty problems. If you go beyond 10 feet, you increase the risk of posts leaning under wind load or failing in high-wind conditions. For areas with strong winds or when using privacy slats, reducing the spacing to 8 feet enhances stability and safety. Sticking to the 10-foot maximum ensures your installation remains compliant and durable.