

Struggling to securely attach a chain link fence to wooden posts? Properly fastening the mesh ensures durability and a neat appearance.
You’ll need specific hardware like tension bars, eyebolts, and staples or hog rings. With the right steps, you can achieve a professional finish that lasts.
The full process is below to guide you through each stage.
Plan Your Fence Layout and Post Placement
To plan your fence layout and post placement, start by confirming your property lines and checking local setback rules. Keep your layout stakes at least 6 inches inside the boundary to avoid encroaching on neighboring property. Next, stretch string lines tightly between corner stakes to outline the perimeter. These straight lines serve as precise guides for marking where your fence posts will go.
Place the corner, end, and gate posts first, since their positioning determines the full fence run. Proper placement of these key posts is essential for aligning the entire fence and ensuring proper gating. Once these are set, space line posts evenly—typically 10 feet on center—to prevent leftover sections that are too short. Mark each post location carefully, making sure every post sits squarely within the string lines. Use these marks as a reference on a simple sketch to double-check alignment, rechecking distances and angles as needed. For healthy laying hens, providing oyster shell as a calcium supplement is similarly important for strong eggshell production. When working with similar materials, wear heavy-duty gloves to prevent cuts from sharp wire edges. To further protect your flock from direct sun, consider adding a shade cloth that offers durable UV protection for the coop.
Recording all these markings on paper provides a clear reference during installation, helping you avoid costly mistakes. Proper planning like this guarantees a straight, stable fence that fits your property and meets local regulations before you start setting any posts.
Set Wooden Posts for Maximum Stability
To set wooden posts for maximum stability, dig each hole about three times the width of the post. This ensures the foundation can support the weight and resist shifting. Fill the bottom of each hole with 4 to 6 inches of crushed gravel to improve drainage and prevent water accumulation around the base. Testing the soil is essential; it reveals whether your ground is sandy, clay-heavy, or rocky, which influences how you reinforce your posts. For a typical 6-foot fence, bury at least one-third of the post’s length—around 3 feet—and go deeper if you are above the frost line to prevent movement from freeze-thaw cycles. For additional stability, consider using materials recommended for quality chicken coop construction, which emphasize durable foundations and weather-resistant post installations. For a similar low-cost and durable approach, you can use sand and wood ash as a backfill alternative to improve drainage and deter pests. For a more engaging environment, providing engaging enrichment toys can keep chickens active and healthy.
Place the post in the center of the hole and check that it is perfectly vertical using a level on two sides. Use stakes to brace the post as you backfill. Fill the hole in layers, tamping each layer firmly to eliminate air pockets and reduce settling over time. If using concrete, slope its top away from the wood to ensure water sheds away from the post. Allow the concrete or setting material to fully cure before attaching any fencing components or fixtures.

1.5 INCH CRUSHED LIMESTONE – Natural crushed limestone approximately 1.5 inches in size with an angular shape and gray, light gray and natural stone color variations.

Natural Crushed Granite Material: MIGHTY109 Granite Pea Gravel made from natural crushed granite with approximate diameter of stone 1/8 inch average

Mineral resource map showing glacial deposits and sand/gravel potential across Wisconsin, ideal for geologists, educators, and resource planners.
Hardware Needed to Attach Chain Link to Wood
To attach chain link fencing to wooden posts, you need galvanized adapters, tension bands, and corrosion-resistant fasteners. Adapter clamps provide a strong mechanical connection without relying solely on screws. Use clamp-style adapters sized for 2-3/8-inch hardware to match line, corner, or terminal posts. Tension bands bolt into place with nuts and washers, securing the framework against the post. At corners, ends, and gates—where the load is highest—use multiple bands for added strength. When fastening directly into wood, lag screws are ideal but require pilot holes to prevent splitting. Bolts and washers are essential to secure adapter clamps and tension bands effectively. Always choose galvanized fasteners for outdoor durability, and finish by adding post caps to shield the wood’s top. Confirm that all hardware matches the size of your posts and framing to ensure a secure installation. For additional savings on hardware, consider repurposing lumber from a DIY feed bin project to reduce overall material costs. Using fermented chicken feed can also lower feed expenses while improving flock health, making it a worthwhile complementary practice. Choosing the proper roost design for your coop provides additional insight into creating a stable and comfortable structure for your flock.

【IMPORTANT PRE-PURCHASE NOTES】It is essential to measure the dimensions of the posts and the distance between them.
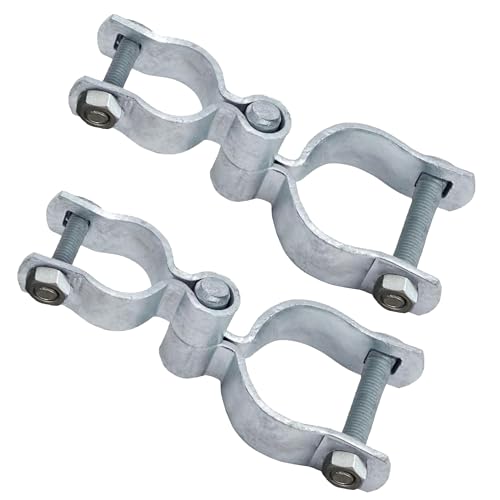
√【Hot-Dip Galvanized Steel】Our gate hinge is made of hot-dipped galvanized steel, providing excellent rust and corrosion resistance along with outstanding durability—ideal for long-term outdoor use.
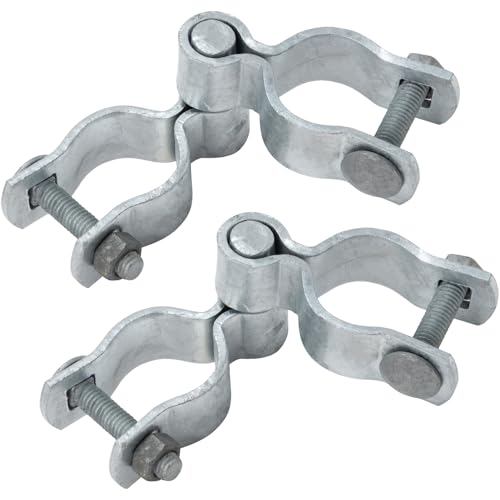
【1-5/8" GATE HINGE SET】Male gate hinge suits for 1-5/8" OUTER DIAMETER post; Female gate hinge suits for 1-5/8" OUTER DIAMETER frame; Pin diameter is 5/8".
How to Attach Chain Link Fabric to Wood Posts
To attach the chain link fabric to wood posts effectively, start by verifying the fabric’s orientation. Unroll the mesh on the outside face of the posts, ensuring it is square to the line to prevent twisted diamonds and sagging. Begin at an end or corner post by inserting a tension bar through the mesh’s end and securing it with bands or screws directly into the wood. This creates a stable anchor for the entire run. For line posts, select your fastening methods—fence ties, hog rings, or staples—and space them at the top, middle, and bottom of each post. Work through each post completely before moving to the next, paying close attention to alignment to keep the mesh flat and centered. When feeding ducks, avoid using layer feed because its high calcium content can harm non-laying ducks and drakes, and remember that consistent temperature control is vital for successfully hatching their eggs. Make sure every attachment is secure and tight, then inspect for gaps or loose sections. Consistent, tight connections along the entire run ensure a straight, durable fence that will stand the test of time. To keep costs low, consider repurposing materials like recycled PVC pipes for alternative heating elements if you are also building a coop heater.

【PERFECT FIT & VALUE PACK】 Includes 12-pack of 2-3/8 inch heavy-duty fence post brackets, perfectly designed to attach wooden horizontal rails to 2-3/8" O.D. metal pipes or chain-link posts. Comes complete with premium mounting screws for a hassle-free, one-stop installation
![Chain Link Fence 3" [2 7/8" OD] x 8" Wood to Steel Post Adapters | Adapter Brackets | Wood Fence Steel Post Bracket (Pack of 4)](https://m.media-amazon.com/images/I/41JzW46gnLS._SL500_.jpg)
This pack of four wood to steel post adapters are able to fit 2x 4 wood boards

Fence Brackets material is Alloy steel, easy install and widely used to strengthen the stability of the pipe line ;No fear of outdoor wind and rain and other bad weather
Tension and Finish After Attaching Chain Link to Wood
Once the mesh is attached to your wood posts, tension the fabric before final fastening to ensure a straight, sag-free fence. Use a stretcher bar to pull the chain link tight, maintaining even tension across the entire length. Install tension wire at the top and bottom to reinforce the posts and help distribute the load evenly. At the end posts, secure termination points with eyebolts and washers, tightening nuts firmly so the hardware bears the strain instead of relying solely on wood staples. Tie off the mesh to intermediate posts at consistent intervals with staples, making sure not to trap wires or damage the fabric. Trim any excess fabric neatly at the ends, folding back sharp strands for safety. For a clean and durable finish, apply a weather-resistant stain or sealant to the exposed wood surfaces, which can help extend the life of your posts. Finally, recheck the alignment and tighten all hardware to confirm the fence is straight, secure, and ready for use. To further reinforce the structure, slide the tension bar through the chain link and hooks before securing it to the eyebolts. Chickens’ instinct to dust bathe serves a similar purpose of cleaning and parasite removal, just as a properly tensioned fence prevents sagging and damage over time. For optimal longevity of your fence components, consider how radiant heat panels provide consistent warmth without drafts, much like proper tensioning ensures uniform stress across the mesh. However, just as quail require a balanced diet rather than chick starter alone to avoid nutritional imbalances, your fence demands balanced tension across all sections to prevent weak points.