

Building a chicken coop that’s both safe and comfortable for your hens might seem overwhelming, but it all starts with the right setup. Choosing a dry, well-drained spot with morning sun can keep your flock healthy and happy.
From there, you’ll learn simple steps to construct a sturdy, weather-resistant coop that keeps predators out and your chickens cozy.
Keep reading to see how easy it is to create a secure home for your flock.
Pick the Perfect Spot and Size for Your Chicken Coop
Choose a dry, well-drained site for your chicken coop, ideally on slightly elevated ground to prevent standing water and mud. This reduces odors and minimizes moisture-related health issues for your flock. Aim to position the coop where it will receive morning sun to help dry dew and afternoon shade to keep temperatures comfortable. Clear the area of brush and tall weeds to eliminate hiding spots for predators like raccoons, dogs, and foxes. Fencing should be secure and predator-proof, with a perimeter that keeps your chickens safe. Place the coop within easy reach for regular checks and cleaning, and ensure good visibility from your house. Adding proper chicken coop lights can help extend productive daylight hours for your flock during shorter winter days. For attaching fencing to metal posts, t post clips provide a secure and simple fastening solution. Using diatomaceous earth in the bedding area can help control mites and other external parasites naturally.
Match the indoor space to your flock size: provide 3 to 4 square feet per standard hen inside, and allocate 8 to 10 square feet per bird in the outdoor run. Leave extra room for potential future additions and make sure there’s convenient access for feeding and cleaning tasks.
Build a Solid, Rot-Proof Foundation and Floor Frame
To build a rot-proof foundation for your chicken coop, elevate it above bare soil using concrete blocks or pressure-treated skids. Concrete blocks are ideal for stationary coops because they provide a stable, durable base and allow for better airflow underneath. Pressure-treated skids are better suited for movable coops, enabling easier relocation without compromising the foundation’s integrity.
Choose pressure-treated lumber for the floor frame to resist decay from ground contact. Construct a level, square rectangle with rim joists, then add interior joists spaced 16 inches on center to support the flooring evenly. Use a tape measure and a carpenter’s square to ensure squareness and levelness, checking diagonals after assembling the frame.
Moisture control is vital; lay a gravel bed under the foundation to improve drainage and keep the frame off damp soil. Secure the framing with exterior-grade fasteners to prevent corrosion over time. Cover the frame with 3/4-inch pressure-treated plywood, attaching seams over the joists for stability. Finish the floor with a waterproof layer such as vinyl to protect against droppings and wash water, extending the coop’s lifespan and maintaining a healthy environment. For those seeking a complete ready-made solution, top-rated models like a coop with run offer excellent quality and value compared to many DIY builds. Building your own feed bin from scrap materials can further reduce overall costs for your flock setup. Harness reviews for chickens offer alternative solutions for managing your flock outside the coop.

2x8 Joist Hanger: The joist hangers for pressure treated lumber is made to be installed from joist to header in wood-framed buildings with roofs, decks, floors, deck and ceilings. Creating a stronger, long-lasting joist-to-header connection

Black 2x4 Joist Hanger: The joist hangers for pressure treated lumber is made to be installed from joist to header in wood-framed buildings with roofs, decks, floors, deck and ceilings. Creating a stronger, long-lasting joist-to-header connection
2x8 Joist Hanger: The joist hangers for pressure treated lumber is made to be installed from joist to header in wood-framed buildings with roofs, decks, floors, deck and ceilings. Creating a stronger, long-lasting joist-to-header connection
Frame the Walls and Roof for a Weathertight Chicken Coop
After securing all walls, add a double top plate to enhance the frame’s rigidity. This extra layer helps prevent wall movement and provides a solid base for roof attachment. Next, move on to the roof construction. You have the option to build rafters or use pre-made roof trusses, with trusses offering quicker installation. When building rafters, cut birdsmouth joints so they sit firmly on the wall plates, ensuring a stable connection. Include a ridge board if you’re constructing a gable roof, which provides a central support for the rafters. Use rafter ties across the lower end of the rafters to prevent outward spreading, maintaining the integrity of the walls. Reinforce every connection with structural screws or metal anchors to keep the frame square and weatherproof. Properly secured joints and sturdy connections are essential for a weathertight chicken coop that can withstand the elements. To further strengthen the roof, trim overhanging edges to desired dimensions for a neat and durable finish.

Sturdy Structure & Wire Mesh: Are you ready to create the perfect living space for your treasured animals? Look no further than this amazing chicken house! Crafted from 1" thick galvanized steel pipes, precise welding, sturdy frames, and featuring a protective hexagonal mesh, our chicken coop with run is built to last and provide a safe space and beautiful living experience for your cherished animals.
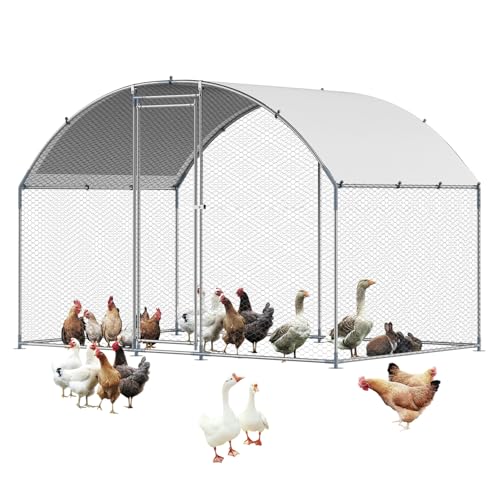
Sturdy Structure & Wire Mesh: Are you ready to create the perfect living space for your treasured animals? Look no further than this amazing chicken house! Crafted from 1" thick galvanized steel pipes, precise welding, sturdy frames, and featuring a protective hexagonal mesh, our chicken coop with run is built to last and provide a safe space and beautiful living experience for your cherished animals.

Room for 3-6 Chickens: Give your hens room for happiness. At close to 10 feet from end to end, provides plentiful space for 3-6 chickens.
Keep Your Coop Dry and Draft-Free With Strong Siding and Roofing
Using corrugated metal for siding and roofing provides a durable, weather-resistant shell that sheds rain and snow effectively. Overlap panels generously, especially on low-pitch roofs, to enhance waterproofing and ensure a clear runoff. Fit exterior wall coverings tightly to minimize wind-driven moisture intrusion.
Controlling condensation is crucial in poultry housing. Metal surfaces can drip when warm, humid air contacts cold panels, so install insulation beneath the metal roofing to prevent this. Add a vapor retarder on the warm side of the walls to slow moisture movement. Continuous moisture barriers are most effective for this purpose. Use proper ventilation to remove humidity at the roof level while sealing gaps with caulk and weatherstripping to prevent drafts at bird height. Maintaining a tight structure with controlled upper-area airflow keeps your coop dry without chilling your flock.

[High-Quality Material]: The multi-functional metal roof panels are made from premium galvanized steel sheets, featuring UV resistance, colorfastness, sturdiness, durability, corrosion resistance, and adaptability to various climates

Premium Materials - NeatiEase metal roofing panels are made of high quality galvanised steel, which has long-term weather resistance, UV resistance, corrosion resistance, no fading, no rust, waterproof.

Heavy-Duty Metal Panels: Our metal roof panels are crafted from high-quality galvanized steel, offering long-lasting weather resistance, corrosion resistance, rust prevention, and waterproofing. These panels remain robust and durable even under extreme weather conditions.
Give Your Chickens Fresh Air, Roosts, and Nesting Boxes in Your Chicken Coop
Install openings high on the coop walls, near the roofline, to ensure warm, moist air escapes upward efficiently. Place vents on opposite walls to create cross-breezes, but keep them above roost level to prevent drafts directly on sleeping chickens. Aim for about 1 square foot of ventilation per 10 square feet of floor space, and opt for adjustable vents to manage airflow seasonally. Proper placement and size keep your flock comfortable and help prevent respiratory issues. Adjustable vents allow you to modify airflow as seasonal conditions change to maintain a healthy environment. A similar approach to cross-ventilation designs used in quail coops can help maintain consistent air quality for chickens as well. When selecting hardware, compare vent options reviewed for durability and ease of use.

【Improve Chicken Coop Ventilation】The adjustable chicken coop vent is designed to flexibly adjust airflow and ventilation in the chicken coop. The metal wall vent not only improves the air quality in the chicken coop but also helps to prevent odor build-up in the chicken coop.

Keep Chicken Coop Well Ventilated: The chicken coop vent is designed to improve chicken coop ventilation, it circulates fresh air, reduces odors and optimizes air quality.The mesh screen built into the chicken coop vent prevents unwanted items such as leaves and debris from entering the chicken coop, creating a more comfortable living space for chickens.

Maintain Good Ventilation: Designed to improve ventilation in chicken coop.Let in fresh air and reduce odors.The built-in mesh screen in the chicken coop vent prevent unwanted visitors like leaves and debris from entering the chicken coop.Create a comfortable coop for your chickens.
Bury Hardware Cloth and Install Overhead Netting for Hawk, Fox, and Rat Defense
Burying hardware cloth and installing overhead netting provides comprehensive protection for your flock. To prevent predators like foxes, rats, and hawks, start by digging a trench at least 12 inches deep around the entire run. Bend ½-inch mesh hardware cloth into an L-shaped skirt that extends outward 18 to 24 inches. Secure this buried section to your frame using heavy-duty staples or screws with washers, then backfill with soil to make it difficult for predators to dig underneath. Above, install bird netting with 2-inch mesh size over the entire run. Stretch it taut across sturdy posts or PVC frames, ensuring it is tight enough to prevent sagging. For a long-lasting setup, drive posts into properly spaced holes and tamp the soil firmly to prevent shifting over time. Secure the netting at corners with zip ties or galvanized staples. Keep the netting tight to avoid creating weak spots where hawks or other aerial predators could potentially slip through. For cost-saving ideas, consider building a DIY Chicken Run Door using repurposed materials like scrap wood or old hinges. This layered approach, combining buried hardware cloth and overhead netting, offers your flock resilient protection from a variety of predators. Interestingly, just as cracked corn floats, understanding material buoyancy can help you design better water feeders to keep feed dry and clean in the run.

Product details: The size of the hardware cloth is 16 inch×50 ft and 1/2 inch×1/2 inch thickness, adopt 19 guage hot-dipped galvanized material. It is very suitable for repairing damaged chicken coops, gaps under houses and other small-sized damaged holes.

TWO-ROOM WALK-IN CHICKEN RUN: The connected two-room layout provides additional outdoor space for poultry, while the full-height entrance allows convenient access for feeding, cleaning, and everyday flock care.

【Upgraded & Unbreakable Hardware Cloth】Guiferland chicken coop features upgraded hardware cloth, made from premium annealed steel wire with a tighter 0.75″ mesh and PVC-coated for outstanding rust resistance and long-lasting outdoor durability. This design not only improves strength but also creates a reliable barrier to keep out raccoons, snakes, and other potential threats. Ideal for chickens, ducks, and small animals, it keeps your flock safe and secure year-round
Inspect Latches, Seal Gaps, and Replace Weather-Damaged Panels Annually
Regularly inspecting your coop’s latches, sealing gaps, and replacing weather-damaged panels is essential for security and protection. Start by checking all hardware: examine every door, pop door, and access-panel latch for looseness, rust, or worn springs. Test each latch by applying pressure to ensure it cannot be shaken open from outside. Tighten loose mounting screws immediately and replace any stripped fasteners to prevent predators from gaining entry. Use a flashlight at night to inspect wall seams, corner joints, and roof connections for light leaks or gaps, and treat any opening wider than ¼ inch as a problem. Seal these areas with predator-resistant materials such as metal flashing or hardware cloth.
Next, examine panels for damage; soft, cracked, or warped panels that no longer sit flush should be replaced. Prioritize panels near ground contact or areas prone to moisture, as these are more vulnerable to weather damage. Do not patch severely degraded panels—replace them entirely to restore a tight, weatherproof barrier. Make this inspection part of your annual routine, especially after storms, to maintain a secure, weather-resistant coop environment.